I also managed to do a little more at the conflat V on Tuesday afternoon.
Progress is slow but steady.

I also managed to do a little more at the conflat V on Tuesday afternoon.
Progress is slow but steady.
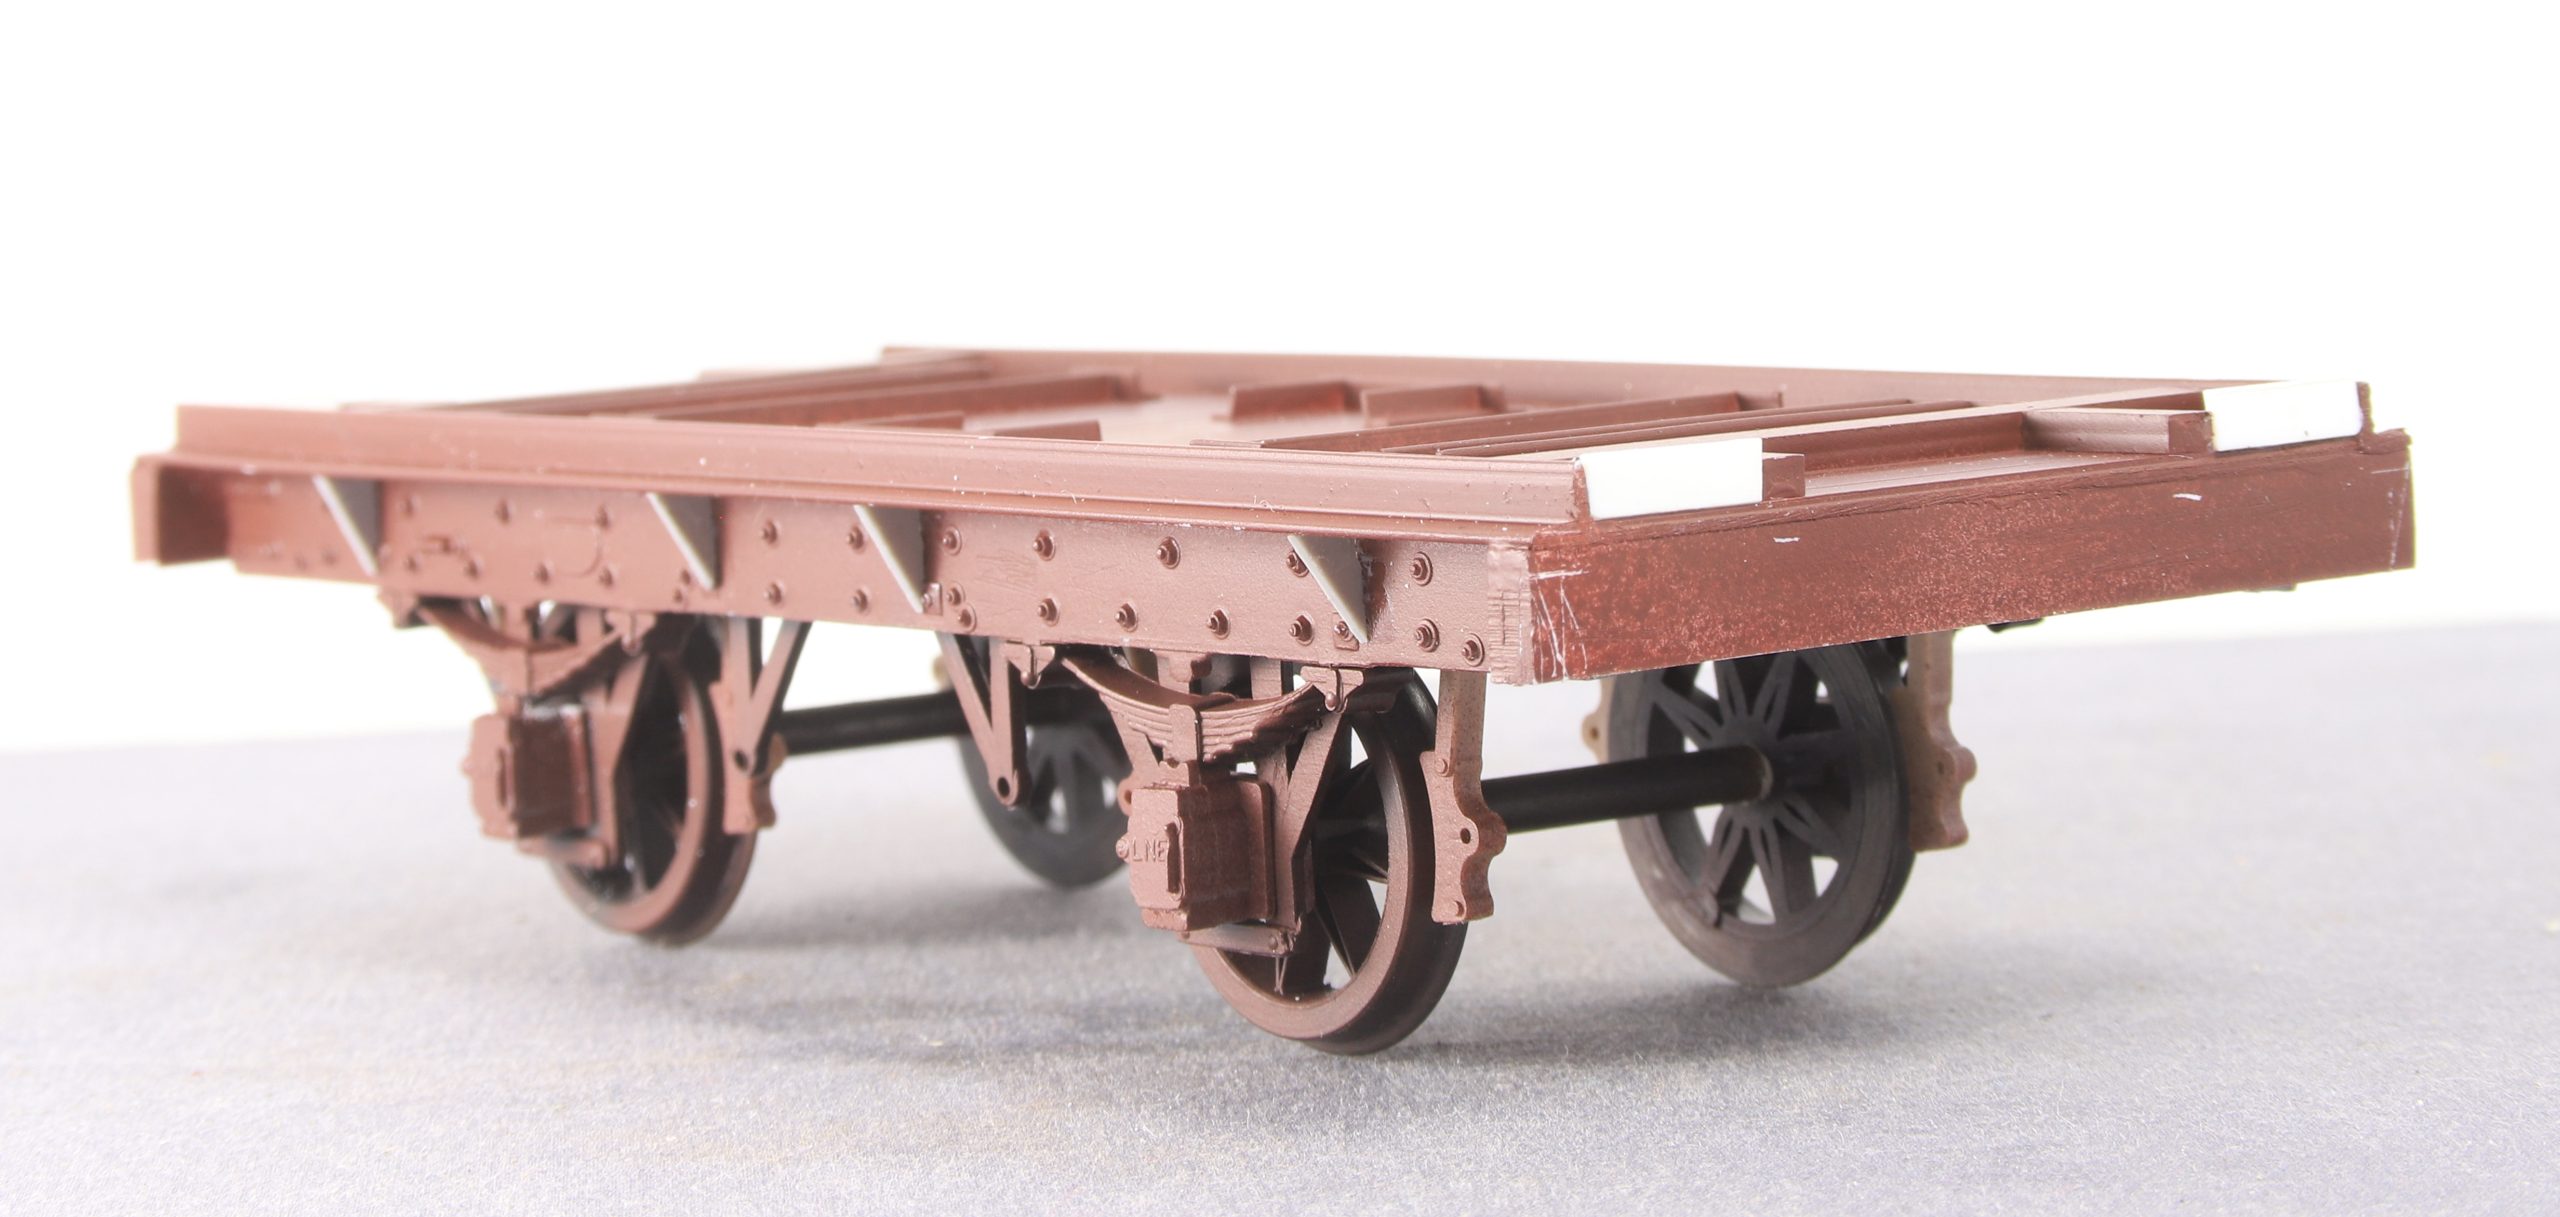
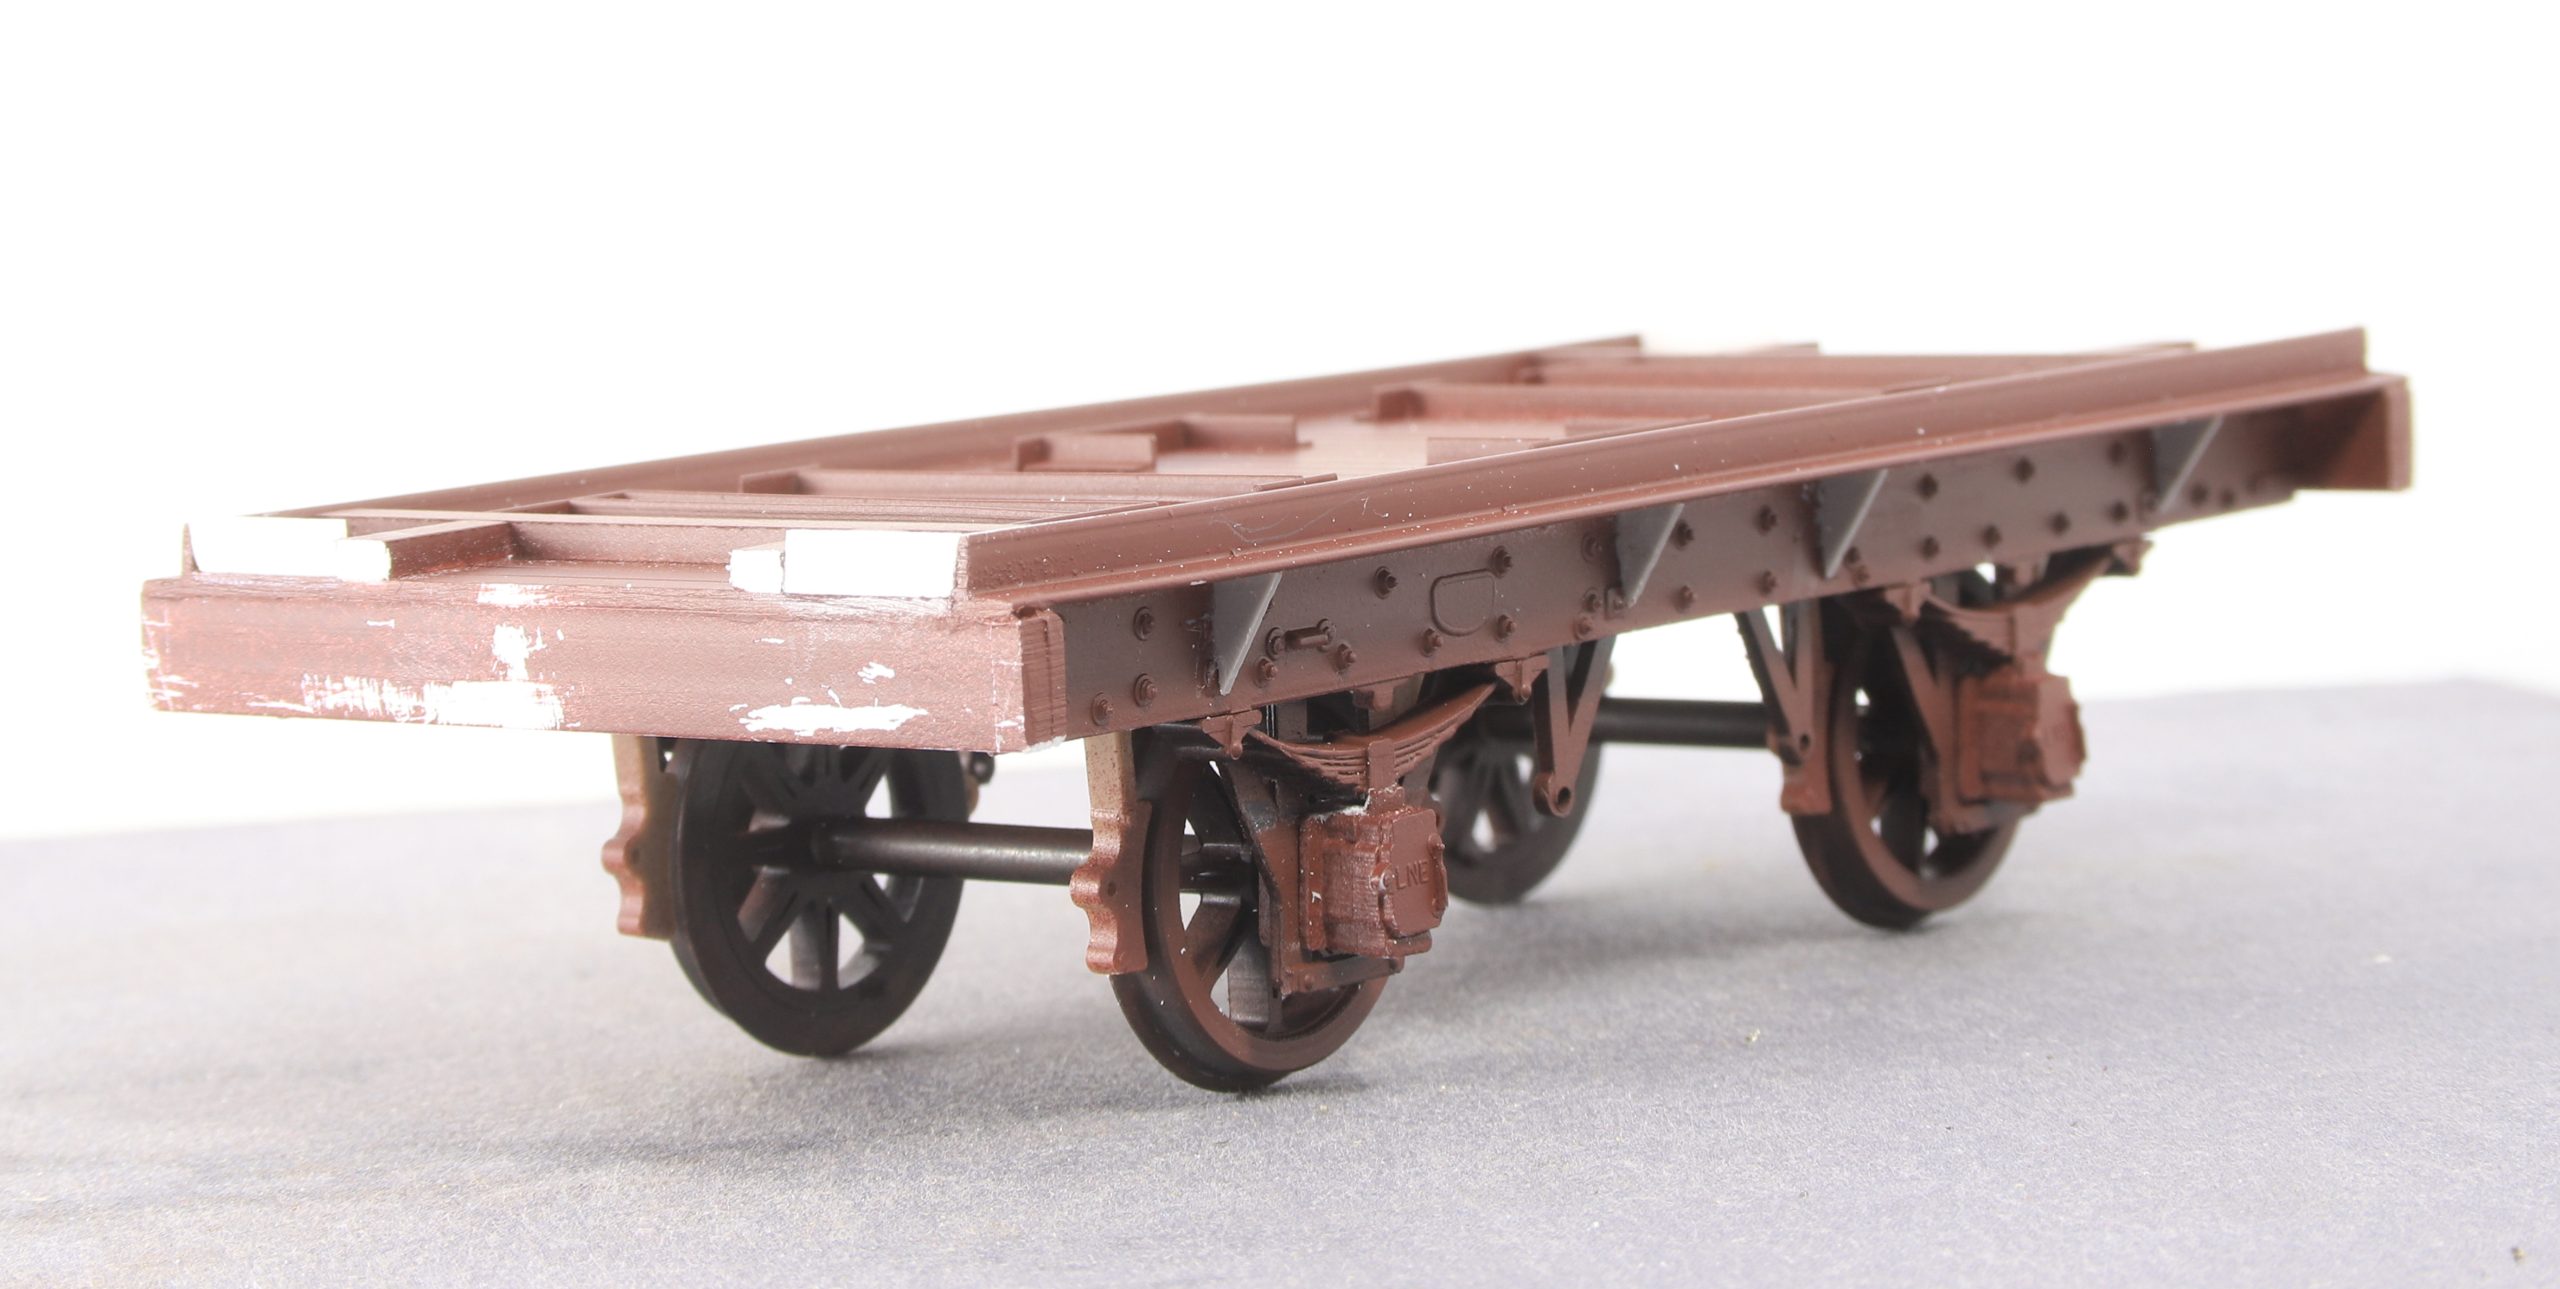
Modelling time in the last week has been a bit limited due to other things taking priority but over the last few weeks at our arts and crafts group I have been working on a scratch build of an LNER Conflat V.
This came about when a friend converted a Connoisseur Lowfit into a Conflat S. While we were exchanging emails on the subject i looked it up in my Tatlow wagon books and noted that the earlier Conflat V’s were made from the underframes from redundant cattle wagons. This reminded me that I had a spare pair of Parkside Cattle Wagon sole bars in my plastic kit spares box.
A rummage through said spares box got me W irons, axleboxes and brake hangers and shoes. I also have styrene sheet, angle and square/rectangular rod.


After getting the basics together I started to add the details starting with the clasp brakes

Then I moved onto adding the various bits of timber and iron work on the top.

It was at this point that I realised just how difficult getting decent photos of white styrene is and after adding more details I have it a blow over with some Vallejo red primer.


Still some way to go but it’s looking the part so far.
I have been a little quiet on the modelling front over the last couple of week because I have been fitting digital readouts to my lathe which became a bit more involved but worked out in the end. Needing something to test it out on I had a go at making some turnbuckle/shackles to secure the packing case to the wagon bed.
Staring with some 1.6mm rod (because I have lots) I drilled a 0.75mm hole 5mm down one and end then turned 3mm off the diameter for a length of 4mm. Then I filed hex flats on the full section and cut off at 5.5m beyond the start of the ‘nut’ This allowed me to reverse the pieces in the chuck, face off the end and repeat the process only this time I drilled right through before turning down 3mm x 4mm off that end giving me these

I only managed three of them before it was time to go to our arts and crafts group again where I fed some 0.7mm wires through and twisted the ends into loops and added hooks.
This gave me these.

Here they are dangling from the packing case.

This morning I have turned another 4 centres and also soldered the gaps in the various links closed including the rings on the packing case itself as a pet hate of min is seeing chains 3 links etc that have open links.

I am most impressed by the ease of repeatability that the DRO on both carriage and cross slide allows.
Over the last couple of sessions at our arts and Crafts groupI have added some lashing/lifting rings to the packing case.

Made from half round 0.8mm wire
I have done more at the packing case since my update. Now it has nail holes I am undecided whether to leave it as raw wood or attempt to paint it. Equally I am debating whether to add a tarpaulin sheet to it or not.


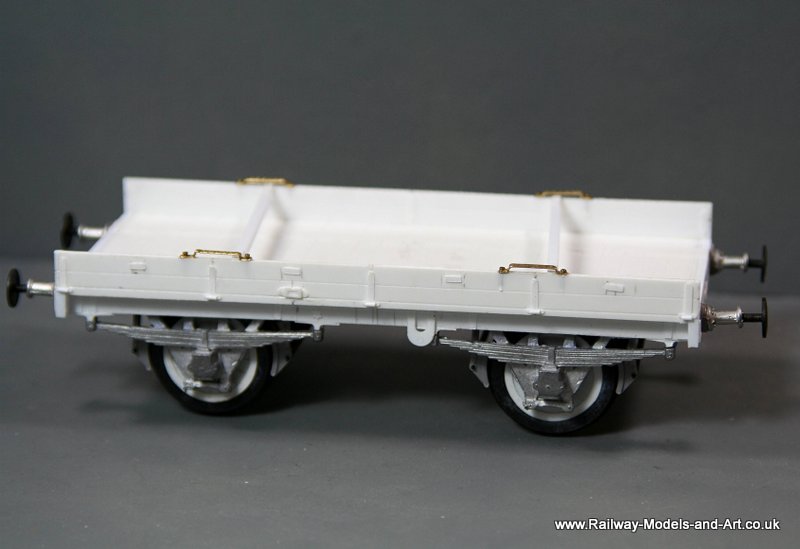
Some time ago I started to scratch build a number of Open Carriage Trucks. There are three GNR examples one GER example all of which are four wheeled but there is also a six wheeled NER OCT. These were large complete but lack final details such as brakes.
For a number of weeks at our weekly arts and crafts group, I have been slowly making a large packing case to fit on the NER OCT. This is made from coffee stirrers and the plan is to represent the OCT as it was modified during WWI when the drop sides were removed and four bolsters added so that the wagons could be used for transporting aeroplane parts.


I still need to complete the OCT itself and add a few more details to the packing case but it’s getting there.
In between building the Kirk coaches I have also been assembling the other exNBR bogie CCT. This one will be finished in LNER livery for my own stock.
In NBR and LNER days the side panels were all half beaded this has been added using 0.8mm half round Plastruct strip.
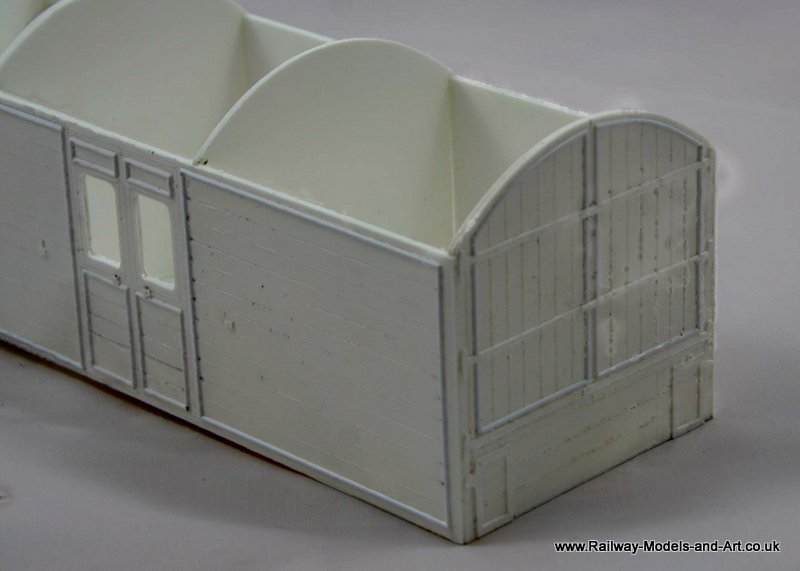
NBR-LNER Bogie CCT
Although I will be making the sole bars from plastruct strip they are too long to make it out of one length so it will need to be joined.
In order that this isn’t visible on the finished model I plan to draw up and cut some 10 thou overlays. Which I plan to rivet in the same manner as the tar tank. This is in the hope that it will save me from drilling, cutting and inserting the many stubs of rod that would otherwise make up the multitude of bolt/rivet heads visible on the sole bars.
Another one that rolled of the work bench this week is the scratch built tar tank that I made the tank body for some time ago.
I am particularly pleased with the way that the pipework has come out.

Scratch Built Tar Tank

Scratch Built Tar Tank

Scratch Built Tar Tank
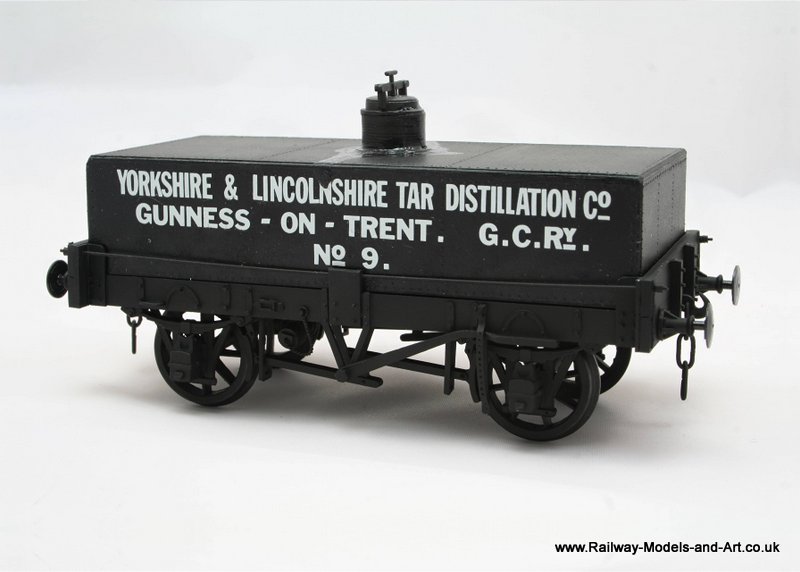
Scratch Built Tar Tank

Scratch Built Tar Tank

Scratch Built Tar Tank

Scratch Built Tar Tank

Scratch Built Tar Tank
While taking photos yesterday I completely forgot the LNER Container. I managed to get the body painted a couple of weeks ago but I wasn’t happy with the colour so I mixed some more. While I had the transfers out I applied some. The photo that I am working from has the container on an ex GER OCT which was before dedicated container wagons were produced. On that basis I am going to leave the paint work fairly pristine although I will no doubt weather the OCT when I get that far.

Silhouette Cut LNER A Type Container Lettered and Painted

Silhouette Cut LNER A Type Container Lettered and Painted

Silhouette Cut LNER A Type Container Lettered and Painted
I had thought that I had brought everything up to date as to my Christmas progress but I had forgotten the NER Implement wagon until I spoke to Graham Beare this morning.
When I began to do more work on it I realised that I had stuck the wrong axlebox/spring castings on, in my haste I had taken those from the Lowmac kit not the IMP. Fortunately I had stuck them on with Rocket Gel Superglue and I managed to prise them of without causing any damage to either the wagon or the castings.
This is where it’s got to so far.

Scratch Built NER Implement Wagon
More progress was also made on the Great Northern Railway Open Carriage trucks. All of them now have brakes and yokes etc.

Scratch Built GNR Open Carriage Trucks
Scratch Built GNR Open Carriage Trucks
Sadly I ran out of parts so didn’t get any further with the 6 wheeled North Eastern Railway truck but I did make good progress with the Great Eastern Railway Open Carriage Truck.

Scratch Built GER Open Carriage Truck

Scratch Built GER Open Carriage Truck
The W Irons and spring arrangement fittings are all either cut on the Cameo or styrene rod – a bit fiddly but immensely satisfying when it all came together.
Another of my last week’s endeavours was to make up and underframe for the tar tank.
My spares box yielded axle boxes/ springs and brakes while the “cameo” spares box yielded W Irons and Crown plates. I will need to cut more of the other washer plates for the solebars but since I already have an assortment drawn for other wagons that should be a simple matter.

Scratch Built Rectangular Tar Tank

Scratch Built Rectangular Tar Tank
One thing that I did notice when checking my drawing for making up the underframe is that this wagon has a 10′ wheel base whereas the Slaters version has either 9′ or 9′ 6″. Which will account for the the differing overall length and the reason that the transfers fit without adjustment.
It makes you wonder whether Slaters (like other manufacturers) developed the kit around reusing some existing underframe parts in their range and then adjusted the tank length to fit. But subsequently someone else developed the transfers around the longer wheel based drawing.
I can see lot’s of sound business reasons for doing this.
Inspired at the time when a gent called Adam built a 4mm scale scratchbuilt Lowmac on a couple of forums that I frequent, I recalled that when buying NER Implement wagons and Lowmac kit’s from Jim in the past he packed a couple of extra axlebox/spring castings. With that in mind and wanting to expand the wagon fleet in this direction I ordered and collected another of each kit from Jim at the Keighley show. This gave me a spare set of axlebox/spring castings for each type of wagon.
So when I was ill a couple of weeks or so ago I drew up the parts for an implement wagon to see how it looked.
Then last weekend in between working on the GER OCT and the A Type container (I was a busy boy because I also finished fitting the handrails to the Parkside unfitted van) I assembled it.
Silhouette Cut NER Implement Wagon

Silhouette Cut NER Implement Wagon
I didn’t get any further with it because I had left the relevant volume of Tatlow at home in Wakefield….. Which seems to be the story of my life just now – I hadn’t been able to assemble the container the weekend before due to leaving the information at home.

ex GER Open Carriage Truck

ex GER Open Carriage Truck

7mm scale LNER A Type Container

7mm scale LNER A Type Container

7mm scale LNER A Type Container
And then there were five…
Although last week was a bust from a modelling perspective due to being ill. When I started to feel better I did get a bit of drawing and cutting done which allowed me to make a start on what I think are the last two open carriage trucks for now.
First I made up the body and basic underframe for the GER OCT that I was enquiring about the origins of on various forums

Modified by CombineZP

Modified by CombineZP
The plan is to finish this with an A Type container (which I have made start on drawing up in Inkscape).
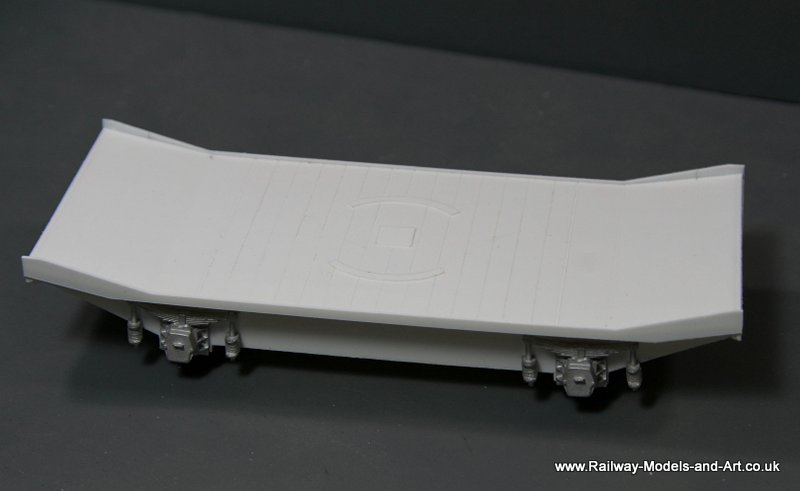
Last but by no means least (because it’s a bit of a beast at 34′ 8″) is a former NER 6 wheeled OCT. Apparently in 1917 these had their sides removed and bolsters added for the conveyance of Aeroplane parts.

NER 6 wheeled OCT

NER 6 wheeled OCT

NER 6 wheeled OCT
I made more progress on the OCTs now having two 21′ and one 18′ examples in similar states of build.

GNR 18 and 21ft Open Carriage Trucks

GNR 18 and 21ft Open Carriage Trucks

GNR 18 and 21ft Open Carriage Trucks
and finally a photos of the star and some modified spring hangers. The cast W Irons and springs were kindly cast for me by Kerry Viney in Australia but nice as they are they didn’t quite match the spring hangers on my drawing but some time ago when I was experimenting with drawing up springs and hangers in Inkscape I had drawn up and cut some hangers which I hadn’t used. I found that If I glued 3 layers together by inserting them on a length of brass wire to index them I could them cut the loop end off and insert them on the bottom of the solebar like you see in the close up below. Not perfect in that they could have been a little wider but now I have the proof of concept adjusting with will take moments before recutting. I will do this for use with the next half dozen that I have, which I plan to use on an NER 6 wheeled OCT

GNR 18 and 21ft Open Carriage Trucks
As alluded to earlier, the last couple of weekends have seen some more scratch building going on.
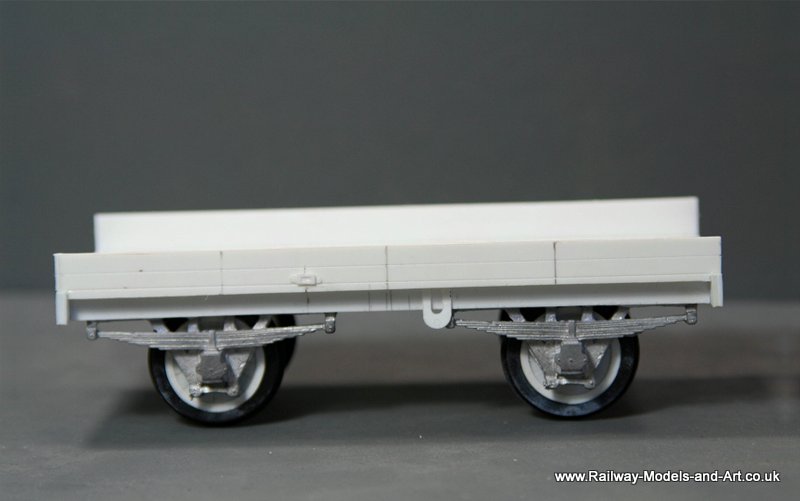
Having painted up my cars I need something to carry them on and Open Carriage Trucks fit the bill as being a little more in keeping than machinery wagons or Lowmac’s. A look through my trust Historic Carriage volumes gave me examples of GNR and NER so I made start on a couple of GNR examples.
First the 21′ version whose Diagram number I cannot recall and I left my book up north.

7mm scale Scratch Built ex GNR OCT

7mm scale Scratch Built ex GNR OCT
Followed by the earlier and shorter (18′) Diagram 375

Ex GNR 18 foot OCT
Ex GNR 18 foot OCT
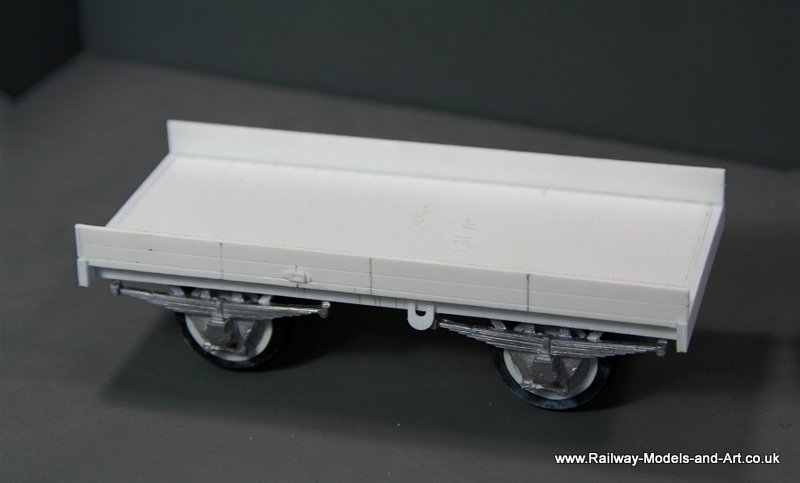
Ex GNR 18 foot OCT
I have another 21 footer started too. All the hinges and details were drawing in Inkscape and cut on the Cameo.
In between other jobs I managed to get a squirt of black paint, the transfers and some weathering on the tar tank.
What was interesting having built an lettered a Slaters kit, is that I took the measurements for this from a Skinley drawing. That drawing must relate in some way to the Slaters transfers because unlike the Slaters’ kit the transfers went on in one piece without having to make any adjustments to letter spacing to take account of the panel size and layout of the rivets.
My Slaters example took several sessions/hours to get the transfers on whereas these went in in about 15 minutes tops for both sides.
My main reason for building this was to do further experiments with the crackle medium to see if I could reproduce cracked tar runs on the tank. I am pleased with the results so far.

7mm Scale Scrtach Built Tar Tank

7mm Scale Scrtach Built Tar Tank

7mm Scale Scrtach Built Tar Tank

7mm Scale Scrtach Built Tar Tank
A quick squirt of primer later and the “rivets” are still visible.
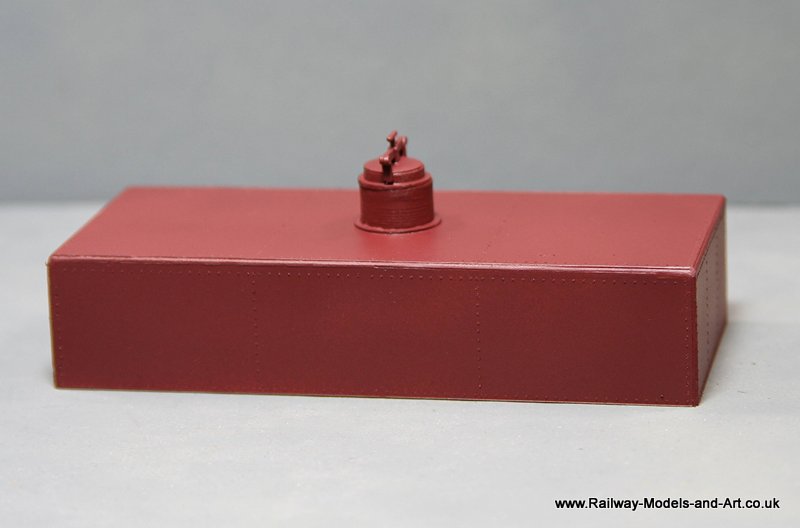
Scratch Built Rectangular Tank

Scratch Built Rectangular Tank

Scratch Built Rectangular Tank
A lot will depend on the results of my ongoing painting experiments using Crackle medium but it’s looking more like I will build an underframe for it by the minute. – Like Horseboxes, you can never have too many tank wagons.
In between while the brain can’t cope with anything too involved I wanted to do some more experiments with Crackle medium because I want to weather my Slaters Tar tub. Like when I did the doors I would rather put my efforts into something useful as opposed to just testing things on a an offcut of styrene. As I was looking for something else a couple of weeks ago I came across a Skinley Drawing for a rectangular tank wagon.
I scanned it, imported it into Inkscape and very quickly cut out some 10 thou overlays for the top, sides and ends. A search in my spares box dug out a spare filler cap. The drawing has a deep filler neck so I glued it to a spare Parkside Vacuum cylinder which was the right size.
I then glued the overlays to some pieces of 60 thou and assembled it all to make up a tank body – I am still not sure as to whether to leave it as a grounded tank or to knock up and underframe and add it to the stock list. I suppose that will depend on how happy I am with the weathering job.
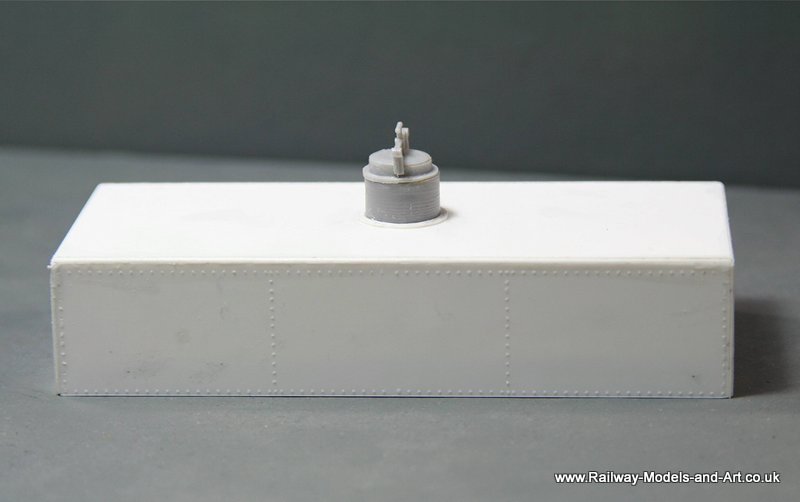
Scratch built Rectangular Tank Wagon
Scratch built Rectangular Tank Wagon
Scratch built Rectangular Tank Wagon
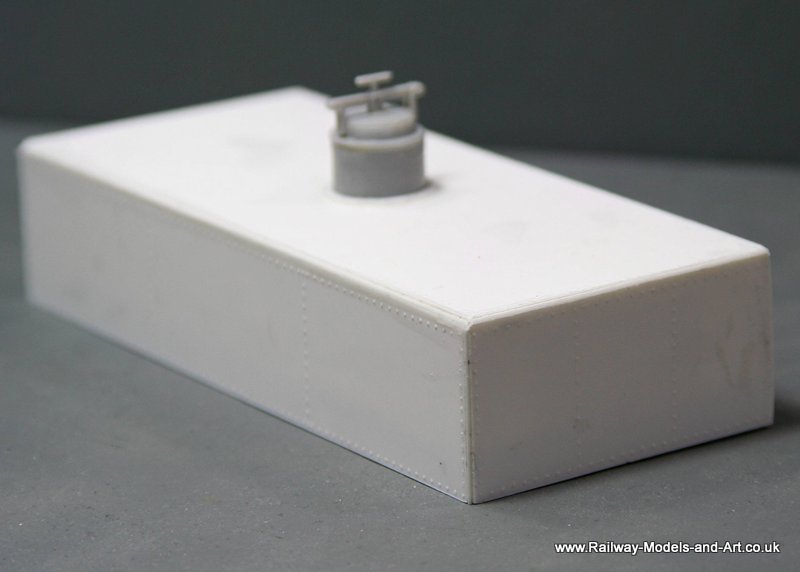
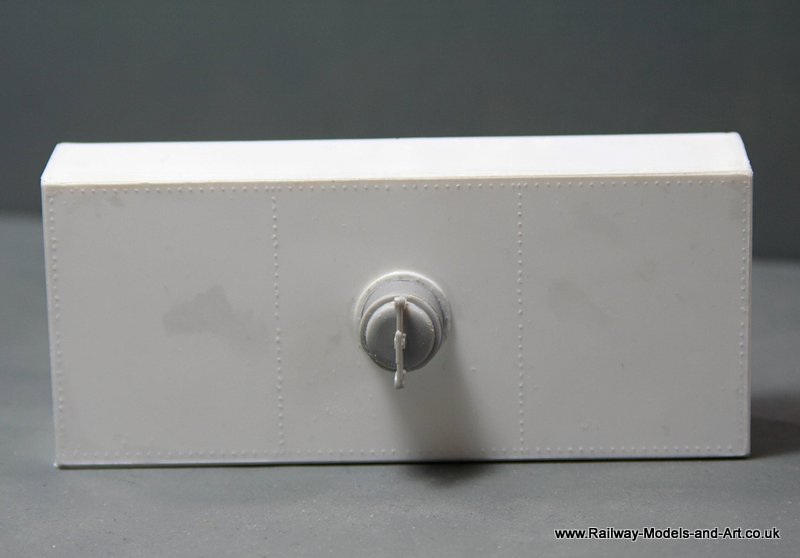
This is straight from the cutter, I haven’t drilled out the rivets and added stubs of styrene rod.
The next step is to put a coat of primer on and see how it looks then.