I didn’t post pictures of the finished article before now because I planned to enter it in the GOG modelling competition. Which was held today.
I am pleased to say it took first place in the Rolling Stock section.


I have always fancied building a horse drawn vehicle or two mainly as wagon loads for several Open Carriage trucks that I have on the go. I was put onto the idea by a gent I spoe to at a show a few years ago who subsequently brought me a horse drawn carriage from a company named Brumm. Some of the Brumm carriages fetch crazy amounts of money but I found one that was being sold as scrap for not much more than postage and bought it to salvage the wheels from.
Although my photo is of a Great Northern Railway parcels van, the only drawing I have is for an LNWR example but they are broadly similar. I scaled the drawing on the basis of the wheel size that I planned to use (the Brumm Wheels are slightly bigger diameter than the LNWR drawing).
I drew out the body pieces in Inkscape and cut them out with the silhouette and got this basic body.
Please excuse the colouring of the photos as I had to adjust them to show the white against the white background…


Back in September 2017 I posted some views if an NER Implement Wagon that I was scratch building using parts cut with the Silhouette Cutter.
Now that my workshop is finally finished I managed to get it finished too.


I should note that applying the transfers was an absolute pain until I discovered what I was doing wrong.
I like to use methfix transfers where ever possible because I find the ability to fine tune the placement (as long as you keep them moist) a great help. In this instance I was using the HMRS sheet for LNER wagons. Now I normally use Johnsons Klear as my gloss coat to apply the transfers to but I had some Vallejo gloss varnish to hand so I used that instead. It turned out to be a big mistake. As soon as I applied the transfers they stuck firmly to the gloss varnish in what ever position they landed in and couldn’t be adjusted without destroying them. After a couple of attempts and some head scratching I decided to coat the other side in Klear to see if that made any difference (before considering buying in new transfers). Lo and behold they worked perfectly as they always had.
Life has got in the way so modelling has taken a bit of a back seat for some time. However last weekend I did manage to do a bit and in between painting seats for the Kirk twin set I assembled some Silhouette cut coach sides for a GWR Director Saloon that I cut out back in January.


Whether you are planning a visit to Guildex or not here is a preview of what’s on view on my Silhouette Cutter Demo on Stand D10
All of them either made completely from or kits enhanced by additional parts cut on the Silhouette

Slaters NER 20 Ton Hopper Wagon with Silhouette Cut internal details

Slaters NER 20 Ton Hopper Wagon with Silhouette Cut internal details

Slaters NER 20 Ton Hopper Wagon with Silhouette Cut internal details

Slihouette Cut NER Implement Wagon

Slaters NER 20 Ton Hopper Wagon with Silhouette Cut internal details

Silhouette Cut GER Open Carriage Truck

Silhouette Cut GER Open Carriage Truck

Silhouette Cut GER Open Carriage Truck
While cutting some battery box supports on the Cameo for the Kirk Twins I thought I would have a dabble with some letters.
Each letter is 8m high and cut from 10 thou styrene.

Tedcaster Sidings Lettering
In between building the Kirk coaches I have also been assembling the other exNBR bogie CCT. This one will be finished in LNER livery for my own stock.
In NBR and LNER days the side panels were all half beaded this has been added using 0.8mm half round Plastruct strip.
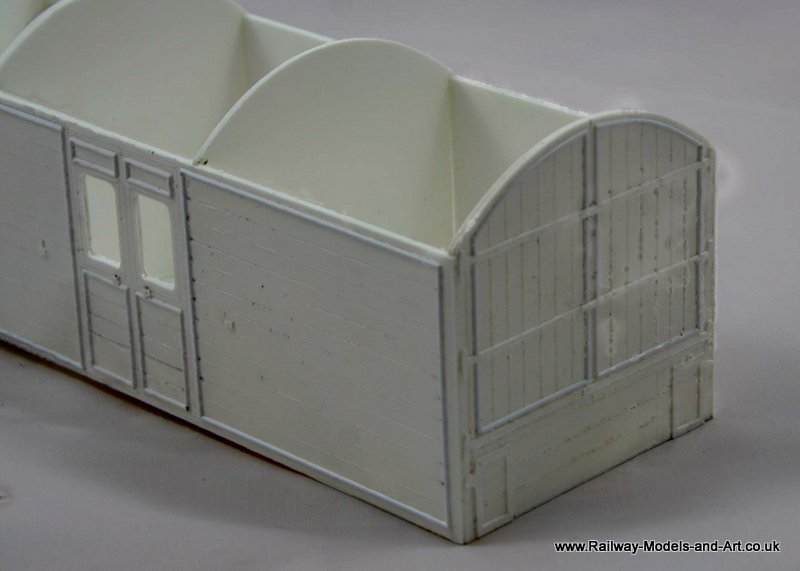
NBR-LNER Bogie CCT
Although I will be making the sole bars from plastruct strip they are too long to make it out of one length so it will need to be joined.
In order that this isn’t visible on the finished model I plan to draw up and cut some 10 thou overlays. Which I plan to rivet in the same manner as the tar tank. This is in the hope that it will save me from drilling, cutting and inserting the many stubs of rod that would otherwise make up the multitude of bolt/rivet heads visible on the sole bars.
Another one that rolled of the work bench this week is the scratch built tar tank that I made the tank body for some time ago.
I am particularly pleased with the way that the pipework has come out.

Scratch Built Tar Tank

Scratch Built Tar Tank

Scratch Built Tar Tank
Scratch Built Tar Tank

Scratch Built Tar Tank

Scratch Built Tar Tank

Scratch Built Tar Tank

Scratch Built Tar Tank
While taking photos yesterday I completely forgot the LNER Container. I managed to get the body painted a couple of weeks ago but I wasn’t happy with the colour so I mixed some more. While I had the transfers out I applied some. The photo that I am working from has the container on an ex GER OCT which was before dedicated container wagons were produced. On that basis I am going to leave the paint work fairly pristine although I will no doubt weather the OCT when I get that far.

Silhouette Cut LNER A Type Container Lettered and Painted

Silhouette Cut LNER A Type Container Lettered and Painted

Silhouette Cut LNER A Type Container Lettered and Painted
I had thought that I had brought everything up to date as to my Christmas progress but I had forgotten the NER Implement wagon until I spoke to Graham Beare this morning.
When I began to do more work on it I realised that I had stuck the wrong axlebox/spring castings on, in my haste I had taken those from the Lowmac kit not the IMP. Fortunately I had stuck them on with Rocket Gel Superglue and I managed to prise them of without causing any damage to either the wagon or the castings.
This is where it’s got to so far.

Scratch Built NER Implement Wagon
More progress was also made on the Great Northern Railway Open Carriage trucks. All of them now have brakes and yokes etc.

Scratch Built GNR Open Carriage Trucks
Scratch Built GNR Open Carriage Trucks
Sadly I ran out of parts so didn’t get any further with the 6 wheeled North Eastern Railway truck but I did make good progress with the Great Eastern Railway Open Carriage Truck.

Scratch Built GER Open Carriage Truck

Scratch Built GER Open Carriage Truck
The W Irons and spring arrangement fittings are all either cut on the Cameo or styrene rod – a bit fiddly but immensely satisfying when it all came together.
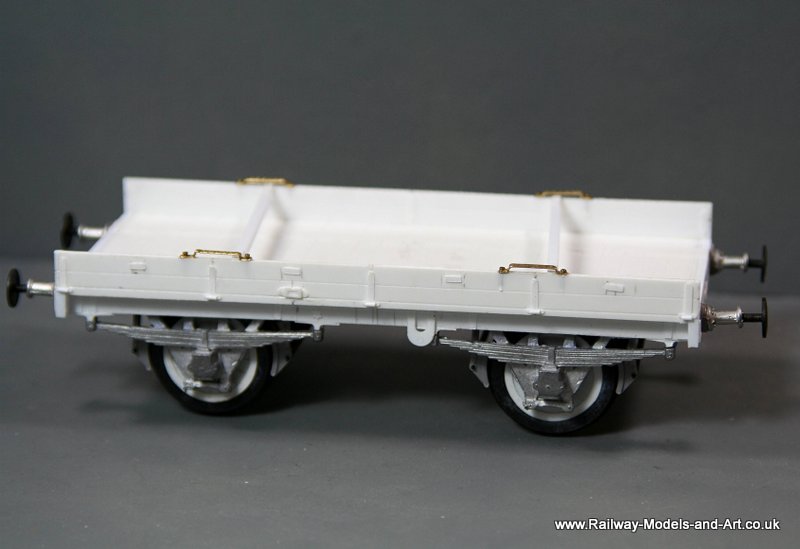
Another of my last week’s endeavours was to make up and underframe for the tar tank.
My spares box yielded axle boxes/ springs and brakes while the “cameo” spares box yielded W Irons and Crown plates. I will need to cut more of the other washer plates for the solebars but since I already have an assortment drawn for other wagons that should be a simple matter.

Scratch Built Rectangular Tar Tank

Scratch Built Rectangular Tar Tank
One thing that I did notice when checking my drawing for making up the underframe is that this wagon has a 10′ wheel base whereas the Slaters version has either 9′ or 9′ 6″. Which will account for the the differing overall length and the reason that the transfers fit without adjustment.
It makes you wonder whether Slaters (like other manufacturers) developed the kit around reusing some existing underframe parts in their range and then adjusted the tank length to fit. But subsequently someone else developed the transfers around the longer wheel based drawing.
I can see lot’s of sound business reasons for doing this.
Inspired at the time when a gent called Adam built a 4mm scale scratchbuilt Lowmac on a couple of forums that I frequent, I recalled that when buying NER Implement wagons and Lowmac kit’s from Jim in the past he packed a couple of extra axlebox/spring castings. With that in mind and wanting to expand the wagon fleet in this direction I ordered and collected another of each kit from Jim at the Keighley show. This gave me a spare set of axlebox/spring castings for each type of wagon.
So when I was ill a couple of weeks or so ago I drew up the parts for an implement wagon to see how it looked.
Then last weekend in between working on the GER OCT and the A Type container (I was a busy boy because I also finished fitting the handrails to the Parkside unfitted van) I assembled it.
Silhouette Cut NER Implement Wagon

Silhouette Cut NER Implement Wagon
I didn’t get any further with it because I had left the relevant volume of Tatlow at home in Wakefield….. Which seems to be the story of my life just now – I hadn’t been able to assemble the container the weekend before due to leaving the information at home.

ex GER Open Carriage Truck

ex GER Open Carriage Truck

7mm scale LNER A Type Container

7mm scale LNER A Type Container

7mm scale LNER A Type Container
And then there were five…
Although last week was a bust from a modelling perspective due to being ill. When I started to feel better I did get a bit of drawing and cutting done which allowed me to make a start on what I think are the last two open carriage trucks for now.
First I made up the body and basic underframe for the GER OCT that I was enquiring about the origins of on various forums

Modified by CombineZP

Modified by CombineZP
The plan is to finish this with an A Type container (which I have made start on drawing up in Inkscape).
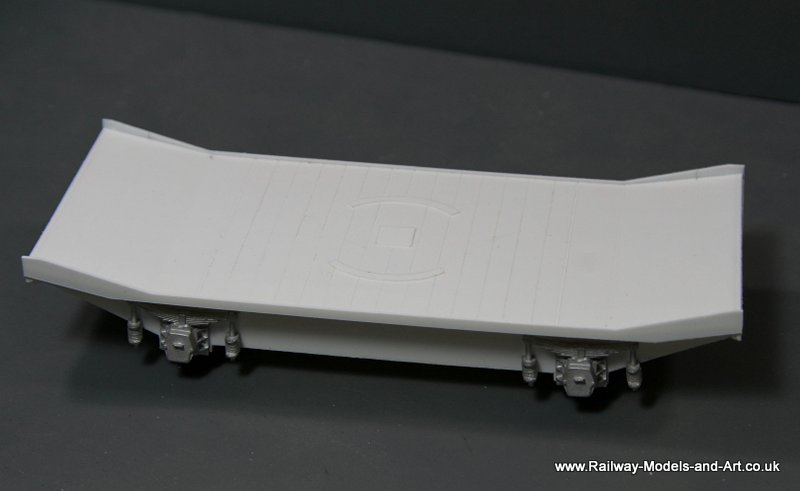
Last but by no means least (because it’s a bit of a beast at 34′ 8″) is a former NER 6 wheeled OCT. Apparently in 1917 these had their sides removed and bolsters added for the conveyance of Aeroplane parts.

NER 6 wheeled OCT

NER 6 wheeled OCT

NER 6 wheeled OCT
I made more progress on the OCTs now having two 21′ and one 18′ examples in similar states of build.

GNR 18 and 21ft Open Carriage Trucks

GNR 18 and 21ft Open Carriage Trucks

GNR 18 and 21ft Open Carriage Trucks
and finally a photos of the star and some modified spring hangers. The cast W Irons and springs were kindly cast for me by Kerry Viney in Australia but nice as they are they didn’t quite match the spring hangers on my drawing but some time ago when I was experimenting with drawing up springs and hangers in Inkscape I had drawn up and cut some hangers which I hadn’t used. I found that If I glued 3 layers together by inserting them on a length of brass wire to index them I could them cut the loop end off and insert them on the bottom of the solebar like you see in the close up below. Not perfect in that they could have been a little wider but now I have the proof of concept adjusting with will take moments before recutting. I will do this for use with the next half dozen that I have, which I plan to use on an NER 6 wheeled OCT

GNR 18 and 21ft Open Carriage Trucks
You didn’t notice because the picture angle didn’t allow it in any case that my GNR 21′ OCT being vacuum fitted has a star on the solebar. Initially because I wasn’t thinking I followed the drawing and what should be a star is actually a hexagon with the points top and bottom. Discovery of another tool Inkscape had me quickly drawing a 6 pointed star (the tool creates either stars or polygons and a drop down allows you to quickly chose how many points.

7mm scale Vacuum Star

7mm scale Vacuum Star
Size wise the points of the stars are 2.5mm across
Some time ago I drew up some inserts for Mansell wheels but I never got around to cutting them out. Seeing Peter Beare’s recent additions to the backs of Slaters wheels over on Western Thunder, brought them to mind again.
While at Telford, the tight Yorkshireman instinct made me take advantage of Haywood Railway’s offer of two axles of coach wheels inc bearings for £5. 00 – I bought quite a few…
Finding myself in need of some Mansell wheels for some scratch build projects (more of that later) I revisited the drawings to amend them to suit the Haywood wheel dimensions and cut them out from 10 thou sheet. Initially I wondered if they would be deep enough and whether I might need a blank spacer but as it turns out they were perfect.

Silhouette Cut Mansell Wheel inserts

Silhouette Cut Mansell Wheel inserts
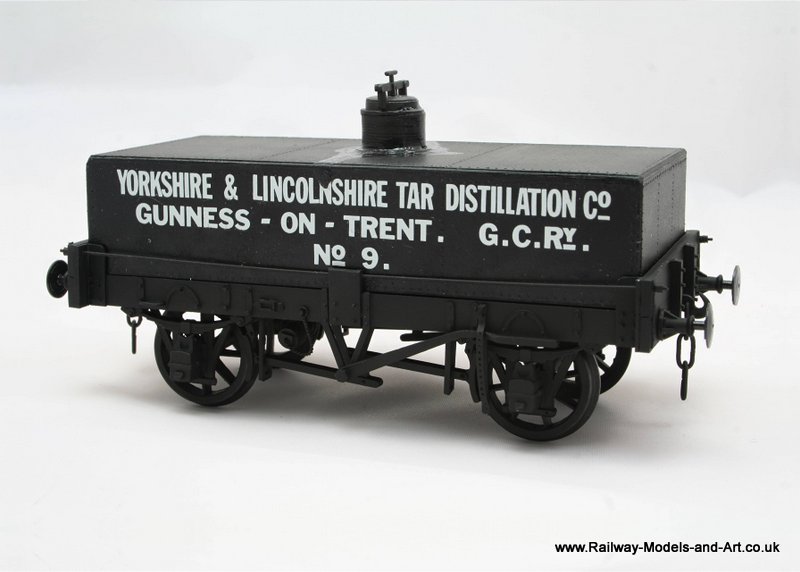
In between other jobs I managed to get a squirt of black paint, the transfers and some weathering on the tar tank.
What was interesting having built an lettered a Slaters kit, is that I took the measurements for this from a Skinley drawing. That drawing must relate in some way to the Slaters transfers because unlike the Slaters’ kit the transfers went on in one piece without having to make any adjustments to letter spacing to take account of the panel size and layout of the rivets.
My Slaters example took several sessions/hours to get the transfers on whereas these went in in about 15 minutes tops for both sides.
My main reason for building this was to do further experiments with the crackle medium to see if I could reproduce cracked tar runs on the tank. I am pleased with the results so far.

7mm Scale Scrtach Built Tar Tank

7mm Scale Scrtach Built Tar Tank

7mm Scale Scrtach Built Tar Tank

7mm Scale Scrtach Built Tar Tank
A quick squirt of primer later and the “rivets” are still visible.
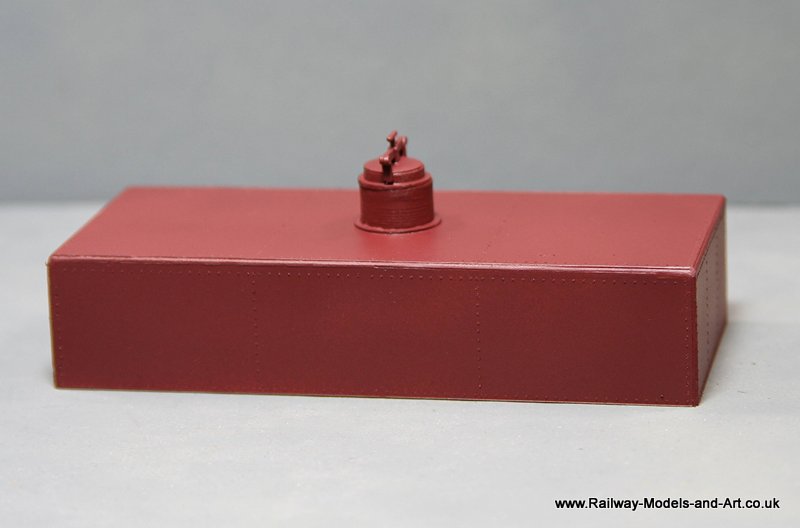
Scratch Built Rectangular Tank

Scratch Built Rectangular Tank

Scratch Built Rectangular Tank
A lot will depend on the results of my ongoing painting experiments using Crackle medium but it’s looking more like I will build an underframe for it by the minute. – Like Horseboxes, you can never have too many tank wagons.