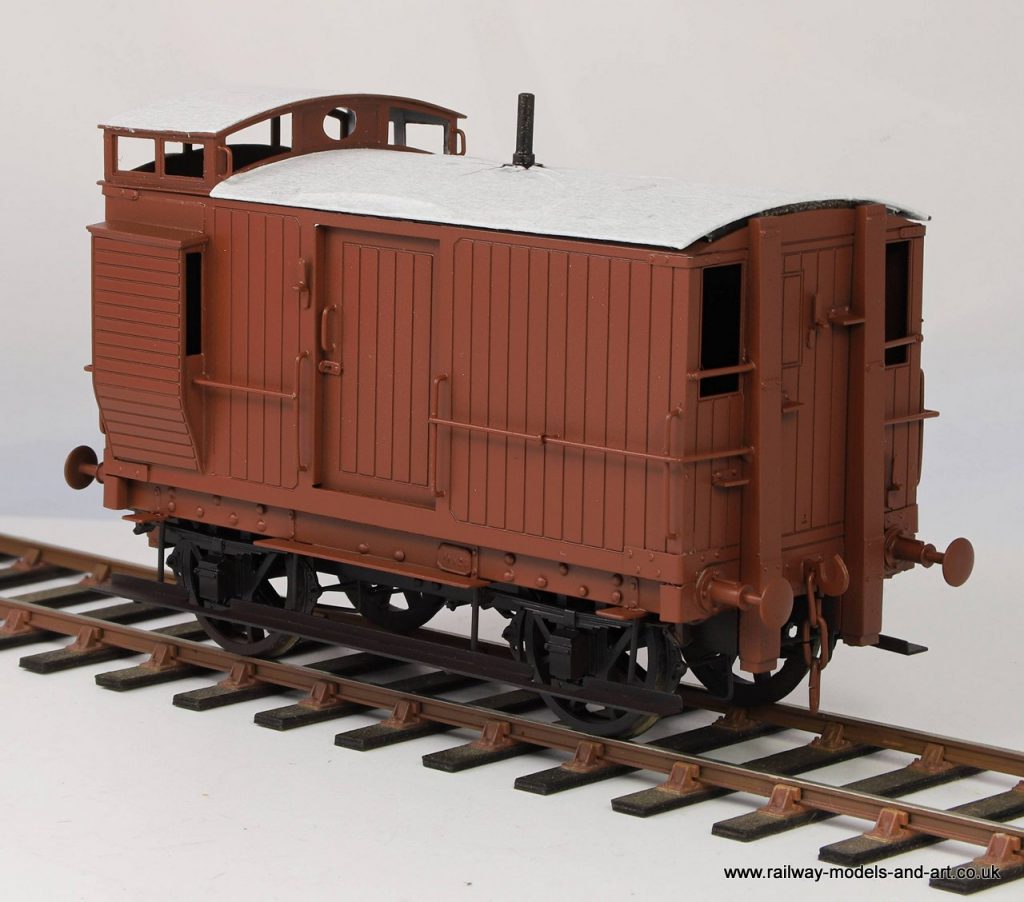
Back in 2017 I started a pair of Connoisseur NER V1/3 and an NER V4 Brake vans, which for reasons that I forget, were put aside. Then in 2021 I painted and lettered the the V1/3’s but only painted the V4 which was left unlettered and again they were put aside.
Since setting up my home office I have deliberately left a number of my shelf queens on display in the hope that eventually their unfinished state would irritate me into doing something about them. This last week in preparation for lettering some wagons for a friend I decided that I would get the V4 lettered, more on that later.
I also took the opportunity to glaze and finish the V1/3’s. Having glazed them I noted that the step boards were a bit on the thin side being etched from the same material as the body. Had they still been unpainted I might have soldered a second layer of thin etch strip to the bottoms to beef them up a bit but with them being painted I looked for other options.
I did consider adding coffee stirrers but they would have been too thick and then I remembered that Brian Dale ([USER=1062]@oldravendale[/USER] ) had kindly let me have a bag of offcuts of veneer. Strips of veneer were enough to thicken the step boards without making them appear grossly over scale.
I cut the strips and glued them to the existing steps with pva, holding them in place until they dried with mini wooden clothes pegs. These were bought on a whim from a craft shop thinking that they might be useful at some point.
Ex NER V3 Brake Van with Side CotesEx NER V3 Brake Van with Side CotesEx NER V3 Brake Van with Side Cotes
The other V1/3 is at a similar state of play. I was going to say what I am struggling with now is a suitable number for this van but just before posting I had another look in Ian Sadler’s North Eastern Brake vans book and on the example shown in there, although the bodyside lettering isn’t visible, the number plate 57916 is so I shall use that as my example.
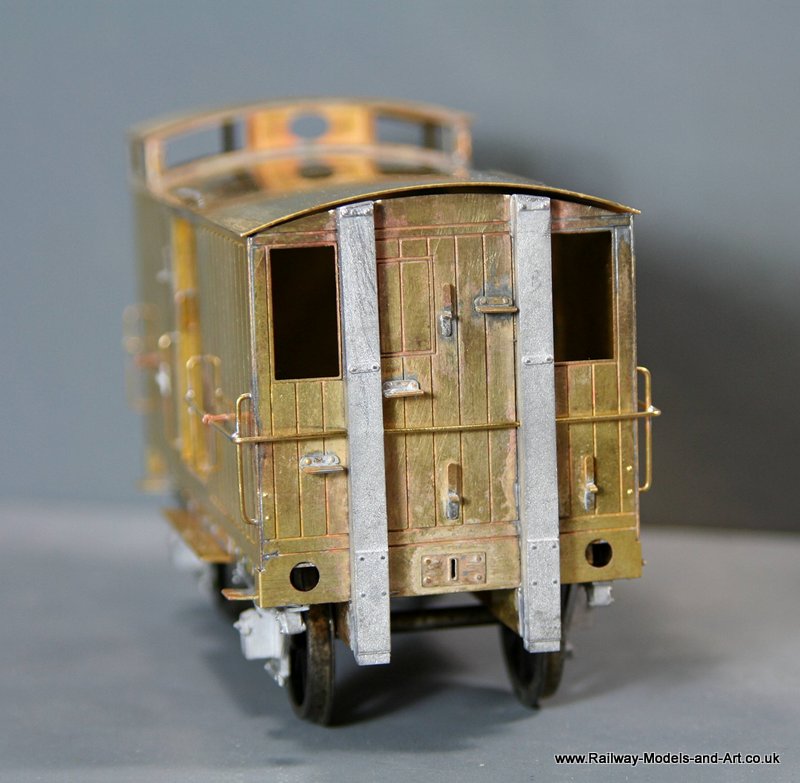
Another two even longer term inhabitants of the work bench from four years ago are two Connoisseur V1/3 Birdcage Brake vans. on a bit of a roll with the V4 I looked at the other two and found that the only things missing from them was buffers.
The reason that I hadn’t finished them initially was because I had read On the late Raymond Walley’s blog that he had replaced the solid buffers supplied with some sprung ones from NMRS. I subsequently bought some from the late Graham Jones at a show.
Fortunately despite not touching them or the V4 van since 2017 I knew exactly where the replacement buffers were so dug them out and soldered on the buffer shanks and then when I went to fit the heads/springs etc. I found that there wasn’t any room for them or indeed access to get the nuts on and tightened.
It is possible to fit sprung buffers, but you need to plan for it and fit them much earlier in the build. In order for them to fit and be able to spring them you need to remove some of the base of the W Iron/spring casting prior to fitting it and adding the wheels brakes etc..
In the end I spent another half an hour removing them and fitting the solid buffers.
Here they are scrubbed up and awaiting paint.
Connoisseur V1/3 Birdcage Brake VanConnoisseur V1/3 Birdcage Brake VanConnoisseur V1/3 Birdcage Brake Van with SidecotesConnoisseur V1/3 Birdcage Brake Van with Sidecotes
Not wishing to waste a good scrubbing, we had a warm dry day here in North Yorkshire today so I popped out and squirted them and the V4 with etch primer.
Isn’t it always the way? You look at the photos and realise that you have missed something. In this case it was the pins and chains for the side doors.
Powsides GER 5 Plank Open
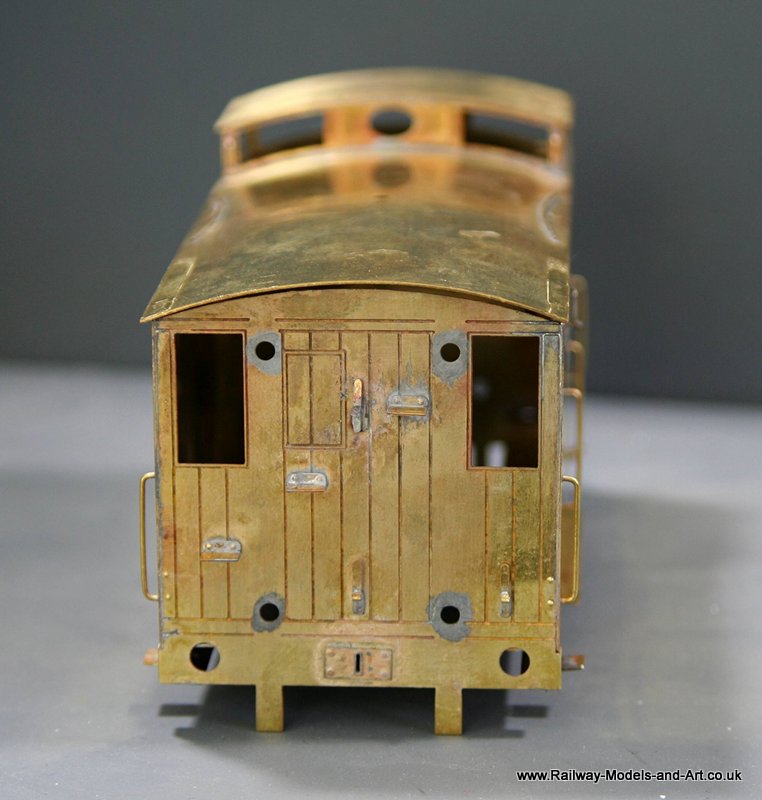
I got the second NER Birdcage brake to a similar state as the first one – just needing buffers and working out how best to fit the roof post painting.
Connoisseur NER V1 Brake Vans
And then something that came together almost as a surprise. As I was doing the two V1 vans I started to clean up and make the various folds in a V4 van and before I knew it, quite a bit was to was ready to solder up.
Connoisseur NER V4 Brake Van
The doors are sliding doors and the way that Jim has portrayed them made leaving one of them partially open almost irresistible. It means that I will need to model an interior but that doesn’t faze me.
Connoisseur NER V4 Brake Van
Connoisseur NER V4 Brake Van
Again it’s a Connoisseur kit and to that I have added square brass rod to beef up the vertical and horizontal framing and some internal planking to the veranda ends.
Connoisseur NER V4 Brake Van
It all needs a good clean up before I go much further with it.
Not much modelling done over the weekend due to a combination of not feeling well on Saturday and a trip to Pontefract show on Sunday. Which was very enjoyable even if I did come back with etches for 4 Pullman coaches which Chris spotted and encouraged me to buy that I hadn’t planned on…
A few hours last night had the first van almost complete (I had thought it complete until I remembered that I hadn’t fitted a couple of hand rails or any guard irons under the brake yokes.
Modified by CombineZP
Connoisseur NER Birdcage Brake Van – Hand rails fitted
The hand rails that are missing are the two small ones above the wrap around rails in this view – the other end should have similar fitted about a quarter of the way up the windows.
Modified by CombineZP
Modified by CombineZP
I didn’t fancy trying to drill out the rather nice cast chimney because it’s very slender so I scratched a pair of replacements from telescoping tube and a cover plate from the spares box, completed them.
I also noted on the drawing that the sliding doors had a hasp so I made a couple from scrap etch.
Last night, the procrastination was over and I got on with removing the end from the other van.
Like a lot of things that you worry yourself about it was really quiet an easy job in the end.
Using a few aluminium hair grips and self locking tweezers as heat sinks for the steps and lamp irons I managed to get the end off, remove the offending bits of metal (with a combination of piercing saw/ rotary sanding drum and a cylindrical burr grinder in the dremel finished off with files) and subsequently soldered back on without anything coming adrift, Yeay!!!
Connoisseur NER Birdcage Brake with Side Cotes
And for completeness these are the photos of progress on the other van that I forgot to post last night….
Connoisseur NER Birdcage Brake Van – Hand rails fitted
Connoisseur NER Birdcage Brake Van – Hand rails fitted
Connoisseur NER Birdcage Brake Van – Hand rails fitted
The last couple of evenings have seen further work on the Birdcage brakes.
Monday saw some of the hand rails and the end posts fitted. – Chris bought me a Proxxon Mini Pillar drill and a Proxxon Bench Vice for Christmas and they have been invaluable in doing these especially drilling out the cast end posts for the handrails.
Connoissuer NER Birdcage Brake Van
Connoissuer NER Birdcage Brake Van
Connoissuer NER Birdcage Brake Van
Connoissuer NER Birdcage Brake Van
Then last night saw the remaining body side handrails fitted along with the upper ones on one end. The drawing and photo from the Sadler book that I am working from has a different layout of the hand rails on the end than Jim shows in his instructions with the end rails passing through the end posts rather than attaching to the outer face of them.
The interested may wonder why I am just working on this one at the moment. That because I think that the only way to be happy with the one with duckets is going to be to remove the end with the birdcage and then cut out the intrusive sides of the ducket and I am still building up the courage to have a go at it….
In between messing about getting my DCC working I have made further progress on the two NER Brake vans. I have been quite impressed that I have managed to add almost all the detail to sub assemblies before making up the main units and adding the solebars. The only things to add to the upper bodies are some corner plates that fold around the corners, some handrails that also go around the ends, the cast end posts and the lower footboards which I need the W Irons in place before I can cut the supports to final length.
7mm Scale Connoisseur Models NER Birdcage Brake Vans
The roof is still loose. Jim recommends leaving it loose to glaze and making it clip on afterwards I need to explore how I can do this yet.
7mm Scale Connoisseur Models NER Birdcage Brake Vans
7mm Scale Connoisseur Models NER Birdcage Brake Vans
Although I have the birdcage for the second one assembled it’s not soldered to the roof yet.
7mm Scale Connoisseur Models NER Birdcage Brake Vans
7mm Scale Connoisseur Models NER Birdcage Brake Vans
Paul Gallon over on RMweb kindly reminded me that the example that I am trying to reproduce with this one also had windows in the birdcage end.
In the photo above you can seem my error. I cut out the windows using those at the other end as a template but didn’t think about the fact the the side duckets have sides which protrude into the van internally and that the sides nearest the end windows partially obscure it. – Why is it that you never notice these things until you have made nice job of soldering the body together, made much more difficult by the fact that on this end I couldn’t get to the inside so I had to solder it from the outside and clean up.
7mm Scale Connoisseur Models NER Birdcage Brake Vans
First a bit of preamble. Back in 2011 for Christmas Chris bought me a few of Jim McGeown’s van kits. At the time I built an LNER Refrigerator van but didn’t get to the others, which were an NER Birdcage Brake, a Perishables van, and a 6 wheeled brake coach.
Around the same time we were sat having lunch in a little cafe in the village of Rosedale Abbey on the North Yorkshire Moors when I saw a picture of one of the NER Birdcage brake van’s at Rosedale but this one had “Side Cotes” (duckets to me and much of the world I suspect) as well as the birdcage on top. I decided that I would like to build one so a couple of years later at a show I bought a second kit and asked Jim if he by any chance had any duff etches that contained the duckets from his NER V4 brake van and he said that he did and duly sent me them.
Having been up north for Christmas we planned a week at home before I go back to work so I dug out both of the brake van kits and modified the sides on one to take the duckets. The duckets were too tall to fit directly so I had to modify those too.
Here’s where I got to the night before last.
Modified by CombineZP
A bit more done yesterday, alas nothing done today…