David Andrews Princess – More fitting of the Upper Works

I set myself a couple of goals for the session, the first was to get the smokebox door ring to fit in the smokebox barrel, the second was to assemble the cab.

Staring with the smokebox door ring, I had decided that filing it would be a complete pain and a last resort if I couldn’t work out how to hold it in the lathe to turn it down.

The amount of rim left after turning would be miniscule so no chance of griping it by that and being able to turn it. I didn’t have any material of a large enough diameter to make a mandrel so I decided to try holding it on the outside of the jaws. Because it’s white metal it would be really easy to distort or mark it. I cut a strip of aluminium drinks can to length so that it would wrap around the circumference of the inner ring but not overlap to throw it off centre. Once inserted I carefully opened the jaws until they were just gripping the part.

I started off by attempting to have it hard up against the jaws in an attempt to get it running concentric but the rivets on part of the ring prevent it from sitting flush so I had to move it away from the jaws and then use a pair of thin parallels inserted between the jaw and the face to ease it until I reduced the wobble to an acceptable level. Despite trying to get it perfectly flat on my glass sheet I wasn’t able to without damaging said rivets so I had to accept a little wobble.

I had the lathe running at about 100rpm or less, I set the carriage stop so that I wouldn’t inadvertently chop of the front rim and then moving in 0.050mm at a time I skimmed the rim at the back of the part. The first cut quickly proved that the outside of the part wasn’t completely circular either. I patiently took cuts until the rear rim was completely concentric, all the while checking the fit of the smokebox front after each cut.

In the end I took off a depth of 0.750mm which equates to 1.5mm overall. That would have been a killer with a file while attempting to keep it circular.

Turning The Smokebox front ring to make it fit inside the smokebox front.
David Andrews Smokebox Front ring
David Andrews Smokebox Door and outer ring

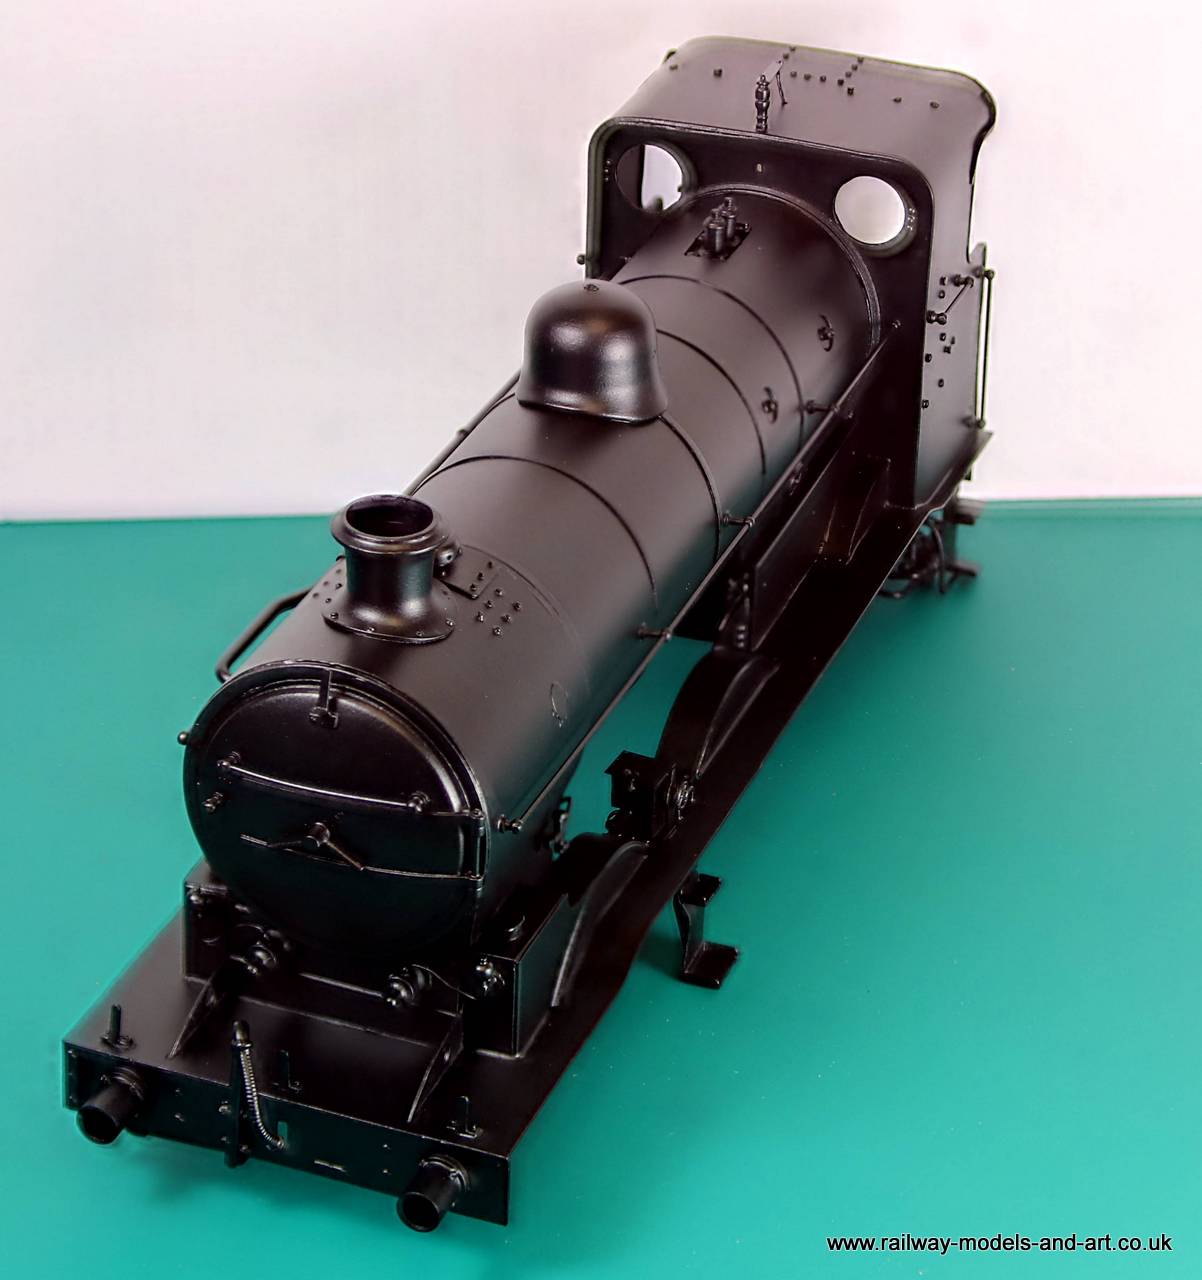
Having got that to fit successfully I turned my sight to the cab. I have never had something so simple be such a complete pain in the posterior to get together squarely. Today’s attempt was my third go at it, and it still took both sides being removed and refitted twice before I was satisfied that it fit as I thought it should. The problem is finding some part of it in between all the rivets and window frames inside that you can put a square against, to hold the sides at right angles to solder them.

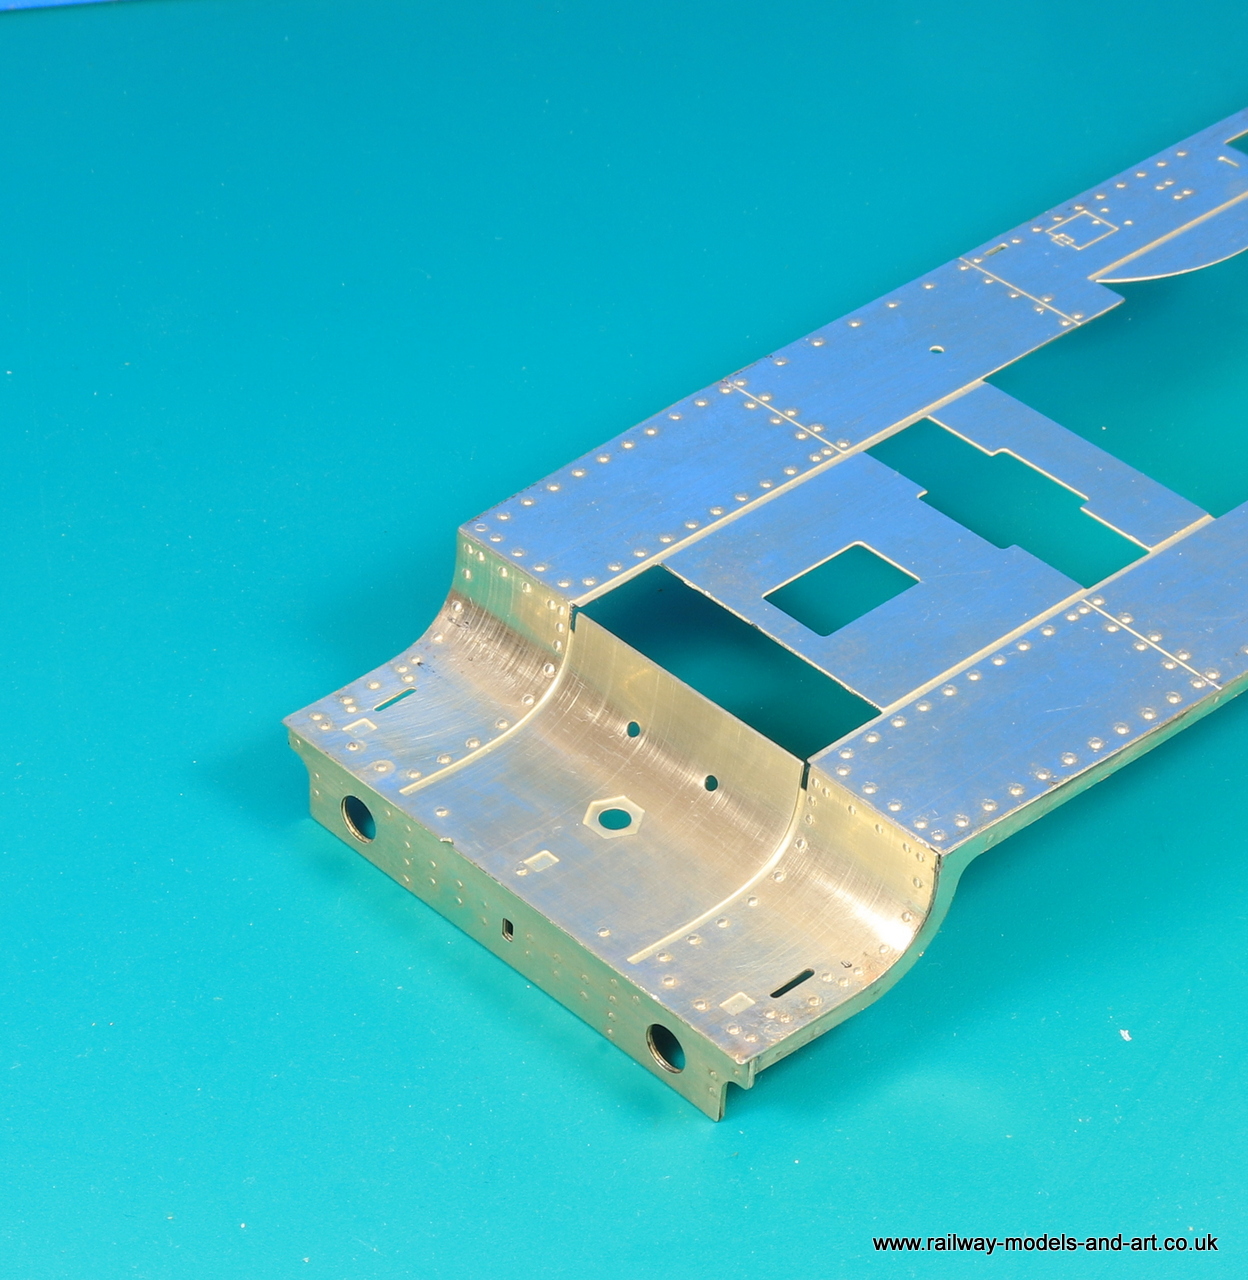
Next, I spent some time with a spirit level adjusting the horn block screws to get the chassis/footplate to sit level.

Having the cab as a datum I can now see that the Firebox needs a slight trim where it goes over the rear splashers so that it will sit level. Once I have done that I need to sort out where the boiler is currently riding on the centre splashers. The problem here being that there isn’t a great deal of clearance between the wheels and the splashers so I think that I will have to cut into the boiler clothing to get it to seat. Once I have the boiler seated, I can consider what to remove from the saddle(s).

David Andrews Smokebox fitting
David Andrews Princess – Either the boiler or the middle splashers need adjustment to get the boiler to sit properly
David Andrews Princess – Firebox needs a little triming to get it to sit down flat

I will start by soldering the cab to the footplate and trimming the firebox…

PS just as I was posting this, I moved the loco from the photo area to my workbench and managed to drop the cab on the floor. Now the first job is to solder one of the cab sides back on….

Just Like the Real Things BG – Starting the teak coat

Needing a bit of an escape from recent forum politics and not wanting to do anything that required too much in the way of thinking I made a start on ‘teaking’ the full brake.

Working from a photo I found on the web I darkened the ends and some upper panels on each side using Vallejo Burnt Umber applied by flat brush and then a few other panels were darkened using Vallejo Flat earth which is my go to colour for LNER coaching stock brown. This is lighter than the burnt umber but darker than the Just Like The Real Thing teak undercoat.

Then I made a start on adding the many layers of Ronseal Teak interior varnish that will eventually make up the coach finish.

The Start of the teaking process on the JLRT BG
JLRT BG Start of the teaking process

Once all the varnish is applied and I am happy with the overall finish I will mask off and spray the roof.

David Andrews Princess – test fit of the boiler, smokebox and saddles

There has been quite a bit of conversation over on the Guild forum about the Smoke box saddle for the David Andrews Princess. It seems that the main saddle casting which is brass is 2mm or so too deep. Oddly there is a second casting which is white metal. I find it most strange that they are made from two different materials

A couple of fellow Guild members whom I have corresponded with on the subject, had the second casting missing from their kits (both bought second hand) and I wonder if was actually there, but like me they missed it because they were looking for a second brass casting. I certainly did until it was pointed out that it was white metal.

David Andrews Smokebox Saddle Castings
David Andrews Princess Boiler and Smokebox test fitted

Before I go any further I need to assemble the cab (I have already soldered the inner and outer cab sides together) and I am sure that I will need to remove some material from the middle splashers to get the boiler to seat properly between them.

Gladiator J6 Transfers Applied

This last week also saw the transfers applied to the J6 a Job I always dread…

Not the best photos in the world but you get the idea.

Gladiator J6 Transfers Applied
Gladiator J6 Buffer Beams painted and Transfers applied
Gladiator J6 Transfers Applied

I also got some paint on the plates and the buffer beams

The loco is to be weathered so I wasn’t too fussed that the cover of the white on the numerals isn’t perfect.

David Andrews Princess – Smokebox riveted and rolled.

Looking at all the rivets to be pressed out I decided that I would finally get around to doing something that I had been promising myself for years. That’s to make a more comfortable handle for the GW Models rivet press. Those who own the smaller of the two models will understand where I am coming from. The bigger 7mm/Gauge 1 version has a round end to the handle the smaller version just has a rectangular bar which gets mighty uncomfortable when pressing a lot of rivets.

My solution was to drill a 13mm hole in a piece of 20mm acetal rod and tap it onto the rectangular bar.

Modification to the handle of my GW Models Rivet Press

So simple but so much more comfortable.

David Andrews Princess Smokebox Riveted Ready to Roll

It didn’t make pressing the rivets out any quicker but it saved the hand, some grief.

Ordinarily I would have taken the slight curl out of the sheet by setting the rivets using a jeweller’s stone setting tool, a technique picked up from Peter Dunn. However, because I plan to roll this and the curl is in the right orientation, I left it as is.

To roll the smokebox with the rivets embossed I backed it with a piece of card from a biscuit packet (Tesco Finest Chocolate Gingers – other sources of card are available).

David Andrews Princess 0.45mm Nickel Smokebox rolled on Warco MiniFormit

Once I filed the etching cusp off the rear former it dropped straight in.

David Andrews Princess Smokebox Soldered around the former

David Andrews Princess – Dry run of rolling the smokebox

Today has been very productive in terms of tackling the smokebox.

After a conversation about rolling a 0.45mm sheet including rivets pressed out with Richard Spoors @Richard Spoors. Where we concluded that my GW 10” rollers were not man enough for the job and would flex. I decided to have a go at rolling the smokebox using the rolling bars on my Warco ‘MiniFormit’ which are a touch over 28mm in diameter so unlikely to flex.

Although I have had it for a number of years, I have only ever used it as a guillotine until today. Rather than risk the actual smokebox to an unknown piece of equipment I decided that I would cut a similar sized piece of 0.45mm sheet and have a go.

Although the actual process of rolling is broadly similar to the GW roller the Warco rollers are of the pinch variety and I must have pinched a little unevenly because I noted on my test piece that one end was marginally wider than the other. Not enough to be an issue but something to be aware of.

The other issue that I encountered was controlling the amount of ‘roll’ On the GW rollers there are two cap head screws on the top that you tighten down simultaneously to get an even roll. The adjustment screws are on the back of the Warco unit so harder to see. They consist of a threaded rod with a round knob locked on with a nut.

Those issues aside, the first go turned out pretty good and it’s perfectly usable. If I don’t find a use for it on a loco at some point, I can always use it as a wagon load.

0.45mm Nickel test piece rolled on Warco MiniFormit

Having done the rolling, I had some thoughts about how best to regulate the amount of roll as the screws are adjusted and came up with the idea of adding a blob of paint on the flats of the locking nut.

I wound both of them to a fixed point and then put a blob of coloured paint on the opposite flats on both nuts – White, Red and Blue so I can now see that I have turned them both by equal amounts.
Not the easiest thing to photograph as it’s bolted to the bench and the screws are on the back.

David Andrews Princess – Boiler test fit

Life has overtaken me this week so far so not much progress on the Princess. I did manage to solder up the boiler which to be fair had been quite nicely rolled and only needed minor tweaks to get it completely round. I had to shave a small amount beyond the etching cusp off the former to get it to fit in the half etch slot in the boiler front but other than that it was quite a smooth process.

Here it is sat on the footplate with the firebox

David Andrews Princess Boiler test fit.

Gladiator J6 Springer Dampers Round Two

While working on the brakes I made a small discovery which made things a bit awkward. When rebuilding the springs and dampers from the original Ragstone castings I had set the dampers much too low under the springs. That combined with them being slightly over size and a few of them not quite being round meant that when testing the wheels rubbed on them and the brake pull rods wouldn’t seat properly.

An easy fix I thought. I will turn up some slightly smaller dampers which will be round and it should be an easy job to pop the dampers off and reseat the replacements flush under the springs.

Oh no when I tried to get the dampers off I ended up pulling the whole thing apart

Gladiator J6 Original Ragstone Spring Dampers

Replacements duly turned I also decided to add the quite prominent nuts on the bottom

Gladiator J6 Replacement Spring Dampers

I decided it would be easier to just assemble the dampers onto some new pins and then fit them to the springs and hangers

Gladiator J6 Replacement Spring Dampers

David Andrews Princess, Getting Carried Away

Although I intended only to make sure that the footplate fits the chassis correctly I got a little carried away and added quite a bit of detail. In reality it actually doesn’t look much but probably represents 5 or 6 hours work. 
In this kit there are quite a few parts that require trimming to fit. In fairness, the instructions do mention it and it’s better to have them oversized, than parts being too small. But it really does create a time sink.
The buffers provided are some rather nice Hobby horse items but like the LG valve guides, the etched holes are too big for the stems. So I had to turn up a couple more spacers to locate them properly. I wont bore you further, with photos of them.

David Andrews Princess Footplate details

I had in mind that the piston rod covers were whitemetal items so I was fully prepared to turn replacements if they were out of register like some of the other castings have been but I was pleasantly surprised to find some nice brass castings on the sprues. 

David Andrews Princess Footplate details

Although I have wittered, above about having to trim a good number of parts. Despite having to trim them to fit, the design of the splasher tops made them some of the easiest I have ever fitted. That is once I had them bent to the right shape and managed to hang onto them to tack solder in place – they kept slipping out of my fingers…  can’t blame the kit for my being clumsy.

David Andrews Princess – Disaster Recovery Time

In my last post I mentioned that bending the full thickness nickel was a bit of a bu**ger. The front drop section proved doubly so.

The handicaps on the front section being that it’s physically shorter so less metal to get leverage with to make the bend and all those rivets that I didn’t want to flatten in the process.

I folded a sheet of printer paper (an old invoice which I keep for scribbling notes on the blank rear side) several times to give me a nice thickness of padding and started to make the bend. To my relief like the back one, having tried it against the side of the valence, I had got it pretty near on the first go.

Then I tried it sat on top of the valance and you can understand my complete and utter dismay! when I noticed the recesses for the lamp irons were sat up under the front of the footplate.

I had somehow managed to turn it around when I wrapped it in the paper and I had nicely created the curve in the wrong end. I am surprised that they didn’t hear my exclamation of Oh sh*t! in York. The only saving grace was that it was a bend not a fold and I hadn’t started to further the bend to get it to fit flush under the front of the footplate.

The good news is that I managed to recover it and re-bend it at the right end.

These two photos show it after straightening and re-bending at the right end and a dry fit before soldering

David Andrews Princess – Footplate dropped front bent to shape
David Andrews Princess – Footplate dropped front dry fitted

These are of it fitted along with the buffer plank.

David Andrews Princess Footplate front fitted

Finally, the weapons of choice used to get me out of my self-created mess.

David Andrews Princess Footplate front fitting weapons of choice

Plus, the all-important ‘how I did it’.

It’s worth mentioning right from the outset that I didn’t anneal it, nor did I consider doing so.

My workbench is partly covered with a sheet of toughened glass, while the other ‘half’ has a cutting mat. I usually use the glass section for soldering and making sure that things are flat/square.

I put the dropped section rivet face down on the folded paper on the toughened glass and gently tapped it with the rubber mallet to start to reduce the curve. Once this had been reduced some. I moved over on to the cutting mat with a 6” x 6” square of hard acrylic sheet that came with my hold and fold.

Its primary use is a firm base for cutting parts from etches. But it in this instance it provided a firm base where I could tap a bit firmer without risking breaking my glass sheet.

I managed to get quite a bit of the curve back out it before moving to the vice and after fitting one side with the soft jaw (the black angle piece in the photo) I started to bend the curve again at the right end.

Once I had the curve in and seated against the footplate, the front end still had a slight curve left in it (see the first photo). To remove this, I placed the part rivet side down on top of the vice jaw with the curved section overhanging.

Then using the length of 10mm brass bar in the photo, I laid it along the length of the curve and gently tapped with the mallet until it took most of the remaining curve out and then I finished of by putting a piece of green pan scrubber under the paper to allow a bit of give and then used the brass bar to ‘roll out’ the remainder of the curve. Making sure to stop before it started to curl the other way.

I share this in the hope that it will give someone else the confidence to have a go at recovering from a wrongly bent piece at some point.

David Andrews Princess Footplate Putting the basics together

Next comes what for me has been the trickiest bit of the build so far.

The bending and fitting of the two dropped curved ends of the footplate. These are full thickness etch and at0.45mm in Nickel they take a bit of bending.

First I fitted the valences using a piece of square bass bar and some surgical clamps to hold it in place and vertical to the footplate. Just a case of tack in several places along the length and then seem between them.

Next on to the dropped sections, I started with the rear section for no other reason than the front section needed the rivets pressing out and I had done enough of that for the day when I finished the footplate earlier in the day.

David Andrews Princess Valances fitted ready for the front section of footlate fitting
David Andrews Princess Valances and foot plate rear


I marked up the start of the bend and another line which should have been the middle of the bend but fell somewhat short. In the event this wasn’t an issue as by some miracle I managed to bend it almost perfect first time. It just needed a gentle bash with a rubber mallet to get the last bit of the curve where it meets the footplate to the right shape.

David Andrews Princess Valances and foot plate rear

While I was on a roll, I added the drag beam too.

Then it was more rivets prior to fitting the front section

David Andrews Princess Foot plate Front Ready for Bending to shape

Gladiator J6 Fitting The Brakes

As I mentioned in the Princess Build Post in between punching out rivets which is a little tedious to say the least I have also done a bit more on the brakes for the J6

The brake hangars are single layer etches and being an older hand drawn kit the holes are a bit on the big side for lengths of wire. I also wanted to make the brakes removable so I turned up some hangar brackets cum spacers.

Gladiator J6 Brake spacers

These are soldered to the chassis and the brakes hang off them. 

Gladiator J6 Brake spacers fitted

This meant temporarily re fitting the wheel, and spring hangars (so that the axles didn’t keep falling out.

Gladiator J6 Brake Assembly

Which allowed me to make up the brakes and have them removable. The GA drawing shows that there were turnbuckle type adjusters at the cab end so I knocked a couple up on the mill.

I also fitted the brake cylinders which requited yet another frame spacer to be milled out…. That seems to be a theme at the minute.

Gladiator J6 Brake Cylinders fitted

David Andrews Princess – Footplate, absolutely riveting!

Before going any further on the chassis I decided to make up the footplate to ensure that all fits as it should.

This has involved lots of filing of etching cusps and much rivet pressing.

David Andrews Princess Cab front and Buffer-drag beams – more rivetting
David Andrews Princess Footplate valances

This is with about 35% of the rivets pressed out on the footplate. I have had to do it in short sessions. In between I have been working on the brakes for the J6 but more of that on my other thread.

David Andrews Princess Footplate part rivetted

Gladiator J6 Top coat of paint added this morning

The sun shone again over Wensleydale this morning so I took the advantage to get the top coat of cellulose on the J6.
This is without doubt the best results that I have ever had from rattle can paints. – ‘Clostermann’ cellulose Satin Black

Gladiator J6 Top coat on
Gladiator J6 Top coat of paint on

David Andrews Princess – Dry Fit of the Cylinders, and Slide Bars (Inside and Outside)

While still deciding whether to take a little more off the cylinders (which I am leaning towards) I decided to do a dry fit of the cylinders, slide bars and the inside slide bars/ cylinder front to make sure that all fitted snugly but freely.

The outside cylinder unit, screws in place and I had deliberately not fitted the frame spacer that it fits to, until I was at a point where I could determine whether or not I needed to modify it to allow the inside slide bars to fit.

As it turned out I did. I needed to cut a slot out of the middle of the spacer between the two nuts.

Now I could have done it with the piercing saw but knowing that I would never have used the piece that I cut out, I found it far easier to pop it in the vice and mill it out.

Milling out a frame spacer

Next, I added a representation of the bottom to the inside cylinders and then assembled all the parts to the frames to check the fit.

Gladiator J6 Then the world turned black!

Then the world turned black.
I had initially primed the tender body a couple of weeks ago when the sun last shone. I took the opportunity of sun here in the dales to get the body primed yesterday afternoon.
I am greatly impressed with the finish of the Clostermans etch Primer. I have used it and the cellulose top coat before but only on loco chassis and you don’t really get the same effect.
It’s also an absolute b***r to light properly for decent photos.
These are my third attempt.

Gladiator J6 Loco Body Primed
Gladiator J6 Tender Body Primed
Gladiator J6 Tender Primed

David Andrews Princess – Still Beavering Away at the Cylinders

A little more work last night, had me fitting a couple of pieces of tube to fit between the front and back plates.

Use of the lathe allowed me to cut them very precisely and fitting them has made a very sturdy unit, which without them was quite flimsy.

David Andrews Princess Cylinders

I have a vague feeling that I might have swapped the covered over as I picked them up off the bench. The good news is that it seems to have resulted in an even better fit than I had yesterday.

David Andrews Princess Cylinders

David Andrews Princess More Work on the Cylinders

Returning today, to the Princess I tackled the cylinders. There was some discussion over on Western Thunder as to the Valve guides and chests being too far away from the edge of the cylinders when compared to a photo that Ian Allen shared.

I have filed quite a bit off but being careful not to overdo it. Easier to take more off than to add it back.

Looking at the photo in my last post I am not sure that you can really tell that I have taken any off but I have.

David Andrews Princess Cylinders filed down

David Andrews Princess Cylinders filed down

I have also dry fitted the cylinder wrappers again I won’t be soldering them in place until I am sure that they don’t need adjusting.

David Andrews Princess Dry Run of the Cylinder Wrappers