
The first 7mm scale loco kit that I got was a present from Chris at Christmas 2009 I first started to build it in Agust 2010 and I have been building it sporadically ever since.
So a couple of weeks ago in between finishing off the bogie van I got it out of the cupboard and started to think seriously about what needed doing to complete it. The first thing was fitting the front bogie I got it and the spring/screw and put it together and discovered the first problem. My lovely home made brake cylinders fouled the bogie and wouldn’t allow it to turn at all – a proper Doh!!! moment. Undeterred I unsoldered them and started to cut them back in an effort to get them to sit further back. Several attempts later and there was nothing left
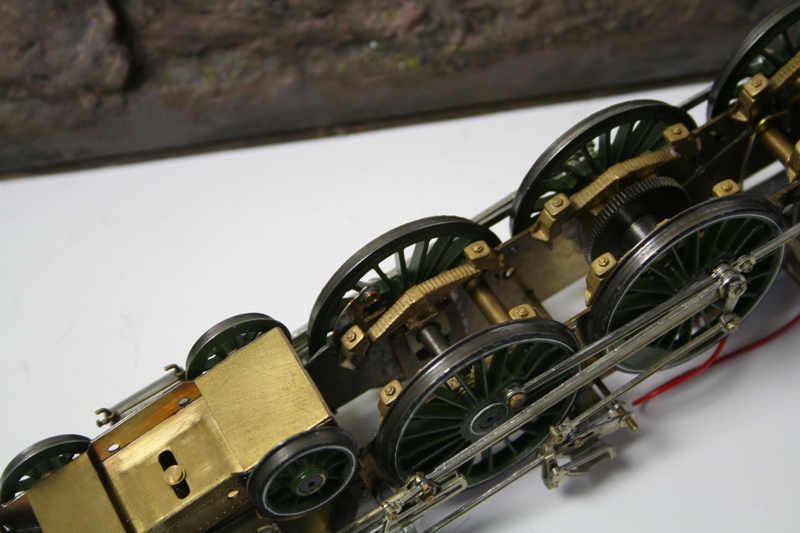
So here we are without any brakes but the chassis runs nice and smoothly and goes around curves as best as I can tell in the limits of my layout boards


During the process one of the front springs can adrift at one side so that needs soldering back at some point.
The next problem that those with a long memory may recall was that when test running I had to rest a pair of pliers on one side of the tender to get it to run. My first thought was that this was down to a bad contact so I drilled a hole in the tender chassis, tapped it 8BA and soldered in a short length of screw (the end off one that I had shortened for something else – I struggle to throw stuff away thinking as now that they will come in useful). You can just see the mark on top of the tender chassis where I filed the paint off to do this.
I then reconnected the tender to the loco and all ran really smoothly. So far so good. however when I fitted the tender body it wouldn’t run despite having a much better connection. It did run if I rested a finger on the tender side. Mmmm! I took the tender body off and examined it and realised that with the whitemetal castings that form the corridor connection top the body is top heavy at one side. Because I am using the american method of pick up the weight was lifting the chassis enough to make running intermittent.
My thoughts turned to how I could weight it from the inside of the tender body because any weight put into the tender top under the coal would be central not to one side that I needed.
I then thought about swapping the pick up sides on the loco and tender which would mean that the tender picked up from the side with the most weight and in theory it should solve the problem.
While all this was going through my mind I took the tender body back off and pondered while running the loco and tender chassis up and down my 4 metres of track. I noticed that the rear most wheels didn’t always turn so I applied some oil to all the axles and running improved. It was while messing with this that I noticed that without the body on although the tender chassis ran up and down quite smoothly and appeared to pick up okay there was a pronounced rock between the front and rear axles and it was biased away from the pick up side. Closer examination revealed a bent bit of the chassis that looks like it has been dropped. I don’t recall dropping it but I must have because no one else touches them.
This is it after a bit of minor straightening with a pair of sooth jawed pliers.


While the tweaking with the pliers hasn’t solved the rocking it has made the rear axle run smoothly. So the next task is to strip down the tender chassis and attempt to straighten it. I will try initially without stripping any paint but if that fails it’s going to be a back to basics job as I am now determined to get this of the bench once and for all so I can with other things without feeling guilty that it still lurks in the background.