Cable Drums, Even More Refined!.

Following my last post on this on the Guild Forum Jim Snowdon set me a bit of a challenge – copied here for context.
“Very neat. Now, all you have to do is band them, and if you are feeling really enthusiastic, model the tail of the inner end of the cable where it pokes through the side of the drum and is secured.

Then, the real test is to load them into a wagon and rope them correctly….

Jim”

Jim went on to give me a big helping hand towards meeting the challenge by posting a link to this Youtube video https://youtu.be/MJ-8X20w3eE – Well worth a watch even if only the first 2 or 3 minutes

So this is how I got on – Bands from black insulation tape and ye olde faithful coffee stirrers for the cover for the cable tail.

Cable Drums with bands

Cable Drums with bands

Cable Drums with bands

Cable Drums with bands


And isn’t it typical that a gap in the banding on one of them only shows up when you have taken the photo….

Cable Drums refined!

In a previous post on wagon loads (Here), I made some cable drums from wooden pieces created by drilling out lightening/cable runs on my layout boards and matchsticks.

Last weekend I came across a few more of the wooden circles and decided to see if I could improve upon them now that I have the NW Shortline Chopper to cut some coffee stirrers instead of the match sticks. An hour later I had 5 cable drums.

A quick resize, a visit to the printer and then some careful cutting out and I had some labels for them.


Scratch Built 7m scale Cable Drums

Scratch Built 7m scale Cable Drums

Scratch Built 7m scale Cable Drums

Scratch Built 7m scale Cable Drums

I told you I was easily distracted….

Veterans Roll

For a future project I found myself in need of a veteran car or two. Having looked around I was quite surprised at how much whitemetal kits were fetching.

I was watching a few models of yesteryear/Lledo types on eBay when I chanced up on a link to Danbury Mint Pewter vehicles. One of the ranges produced were to a nominal 1:43 scale and I had a few on watch when I chanced up upon three that were listed as spares/repairs at £15 for the three buy it now or best offer. I offered £10 and it was accepted. When they were delivered I was soon able to solder the broken wheels and straighten out the bent window frames which seemed to be the limit of the issues.

I intend to add glazing and paint etc.


Rolls Roycle Sliver Ghost

Rolls Roycle Sliver Ghost

Rolls Roycle Sliver Ghost

Rolls Roycle Sliver Ghost

1904 Rolls Royce Silver Ghost


Jaguar SS/100

Jaguar SS/100

Jaguar SS/100

Jaguar SS/100

1936 Jaguar SS/100


MG TC

MG TC

MG TC

MG TC

1948 MG TC – this last one is right at the extreme end of my modelling era but that shouldn’t matter with what I have planned for it.

3 1/43 scale Cars

3 1/43 scale Cars

All in all an interesting side project and I would recommend looking at the Danbury/Franklin Mint 1:43 ranges because they have done cars right up to the 1980’s and can be picked up at reasonable prices – some of them are complete and painted too but as you might imagine they fetch a bit more.

Cheap Model Tarpaulin Wagon Sheets

Following on from my last effort on the wagon sheet, Bob Alderman posted a comment on how he does tarpaulin sheets on the Guild forum, which was a commercial paper sheet suitably scrunched up and then wet with dilute PVA until it lays over and takes the shape of the object that it covers.

So I had a play.

I started with this:

Skytrex Wagon Load

Skytrex Wagon Load

Placed on the lid of a takeaway tray on a couple of cocktail sticks to stop it sticking to the lid I covered it in cling film and then draped a man sized tissue over it which had the patterned edge trimmed off.
Then I dripped dilute PVA over it all until the tissue was soak and draped over the load.

I left it a couple of days to dry and then sprayed it with grey paint so that I could see what I was looking at.

Wagon Sheet from Tissue paper

Wagon Sheet from Tissue paper

It holds it’s shape nicely but like many items we model could be crushed with mishandling.

Another Wagon load from Household Waste.

Following on from a posting about wagon loads from household waste, albeit much belatedly, a gent on the guild suggested that the siphon valve wouldn’t really work as a load due to the size of the screw thread. That made sense and at the time I thought that it would make a load that could be sheeted if only I could make a suitable tarpaulin.
Fast forward to Ian G posting a link to an article on making realistic tarps (http://www.militarymodelling.com/news/article/making-realistic-tarps/3310) and I thought that I might have the answer. Sadly several attempts were made none of which were good enough to me. The first using Kleenex tissues just disintegrated and using the process on thin cloth worked but it wasn’t flexible enough. As a last resort I put a few lens cleaning tissues on one side after they were used to dry out and hey presto they worked.
This is what they look like after being ironed and treated – not much different in looks to be honest but they feel slightly thicker and have a texture. More importantly they can be handled/folded/stretched without mishap.
IMG_8620
Next I cut some styrene discs using a leather punch and stuck them to a sheet to make eyelets. When they had dried I drilled holes through them and then brush painted both sides of the sheet black (the original plan was to spray them but I ran out of time last week). Next out came a cheap stencil and the letters LNER were painted on along each edge and some cotton cords tied through each eyelet.
LNER Tarp

LNER Tarp

In between this while things were drying, etc. I made up a timber cradle for the load.
7mm ScaleWagon load from Household waste;

7mm ScaleWagon load from Household waste;

Lastly I tied it all on – I had to add a couple of staples made from 0.45mm wire to the cradle ends to allow the sheet to be fastened.
7mm Scale Sheeted Wagon Load

7mm Scale Sheeted Wagon Load

7mm Scale Sheeted Wagon Load

7mm Scale Sheeted Wagon Load

7mm Scale Sheeted Wagon Load

7mm Scale Sheeted Wagon Load


Playing about with image stacking

Last night I had a mess about with image stacking – I am quite pleased with the results so far. Each final image is made up from 5 original images combined into one.

Scratch Built NBR 4 Plank Dropside Wagon

Scratch Built NBR 4 Plank Dropside Wagon

Parksdie NBR 4Plank Open

Parksdie NBR 4Plank Open

Parksdie NBR 4Plank Open

Parksdie NBR 4Plank Open

Slaters 7mm PO Salt Wagon

Slaters 7mm PO Salt Wagon

Slaters 7mm PO Salt Wagon

Slaters 7mm PO Salt Wagon

Scratch Built NBR 4 Plank Dropside Wagon

Scratch Built NBR 4 Plank Dropside Wagon

A load of barrels….

Despite using the NBR 4 plank to “show off” the packing case that I built from coffee stirrers it was never it’s intended load.
While browsing the NBR section of LNER wagons volume 3 (as I was detailing the 4 plank and making up the body for the drop side version) I noted that when carrying barrels the NBR had made use of what I can only liken to the  plaited rope fenders that ships and barges etc. use to protect the sides of the vessel whilst docking.
NBR 4 Plank Open with Barrel Load

NBR 4 Plank Open with Barrel Load

NBR 4 Plank Open with Barrel Load

NBR 4 Plank Open with Barrel Load

NBR 4 Plank Open with Barrel Load

NBR 4 Plank Open with Barrel Load

NBR 4 Plank Open with Barrel Load

NBR 4 Plank Open with Barrel Load

NBR 4 Plank Open with Barrel Load

NBR 4 Plank Open with Barrel Load

Using an idea given to me by Bob Alderman,  I used short strands of sisal string for the straw and Chris kindly plaited some longer lengths of string that had been separated into individual strands and I then coiled them up and glued them into a flat cushion. After colouring them with dilute paint and trying them in the wagon with the barrels I found that two together created a better effect.

Timber Wagon Loads from Coffee Stirrers

While at a recent show (O gauge North West at Manchester I think) I noticed a demo of a Gent making a timber load from strips of Microstrip which looked quite interesting. It gave me an idea for a use for a box of coffee stirrers that I bought from eBay a few years ago.

Before seeing the demo to make such a stack of timber I would have cut some coffee stirrers to length and then glued them all together into a stack. What this gent did was make a hollow stack with short pieces in place at the ends. In terms of what I planned it would not only use less coffee stirrers but also allow me to make use of the cut rounded ends which would otherwise be surplus.
I started by using a 7mm scale rule and a square to cut 14 stirrers to a scale 16’ long (they were a scale 20’ overall allowing for 2’ to be cut from each end. These were then stuck together 2 high by 7 wide to make a base. To glue them together I used Crafters Pick PVA superglue. This is much thicker than normal PVA and gives a good grab for all sorts of things.

Timber wagon load from Coffee Stirrers
Next using the cut rounded ends and some lengths of some sticks that were not straight/flat I built up the ends and some inner supports


Timber wagon load from Coffee Stirrers Timber wagon load from Coffee Stirrers

Finally finishing with a lid the same as the base.

Timber wagon load from Coffee Stirrers Timber wagon load from Coffee Stirrers Timber wagon load from Coffee Stirrers

The stirrers that I used for this trial scale out at 11” wide boards and I plan to make some more with smaller scale boards using the same techniques but scoring the top boards and the ends to represent narrower finished boards.

Pipes!

In between progressing the lime wagon last weekend I also finished painting my last Skytrex wagon load which is a set of pipes.
Skytrex Wgon Load - Ceramic Pipe s Skytrex Wgon Load - Ceramic Pipe s
I have struggled to get some decent photos that show that they do actually look like ceramic pipes – achieved by painting them with artists acrylic terracotta (which I managed to get to spray without problem by thinning with Tamiya thinners). This was then painted with a couple of layers of Johnsons clear to get that deep sheen that you get on glazed ceramic pipes.
I may need to scratch build a pipe wagon (if I can find a shortish prototype – the load is designed to fit a 10′ wagon). I have a Connoisseur Pipe wagon kit in the stash but having looked at the size of one when built up this load would be dwarfed by it I think.

Carboys but no indians

I mentioned previously that I took advantage of a Skytrex wagon load offer over Christmas. Among those that I bought were a couple of loads of carbouys. I sprayed them a while ago with a base coat of Vallejo matt earth but it took until last weekend to get any detail paint on them.

The look that I wanted was the dark green glass that I remember from my youth.

In the flesh I think that I have achieved it but they were quite difficult to photograph. I used Vallejo bronze green covered over by a couple of thick coats of the original Johnsons Klear – I stocked up before they changed the recipe. The woodwork and straw packing is Vallejo Bleached Bone with a drop of Model Air New Wood mixed in.

Skytrex Carbouy Wagon loads Skytrex Carbouy Wagon loads

Skytrex Wagon Loads

Having been pleased with the look of the Skytrex barrels that I did earlier ver Christmas I took advantage of a Skytrex special offer and bought some wagon loads. These consisted of two different loads of barrels – from a choice of three or four, a load of sacks and a couple of loads of carboy’s (demi-john type jars) packed in straw.

In between other jobs I have painted a couple of them.

Skytrex Wagon Loads Skytrex Wagon Loads Skytrex Wagon Loads Skytrex Wagon Loads

Barrels of fun…….

While I had the paint on the go I decided to see what I could with these:

Skytrex Barrels Skytrex Barrels

They are Skytrex resin that I picked up from their bits and pieces bin for £1 per strip, I do wish that I had bought more now because they don’t seem to have them on their site.

I am quite pleased with how they have turned out – they were photographed in this morning’s bright sunshine but they are quite subtle in reality.

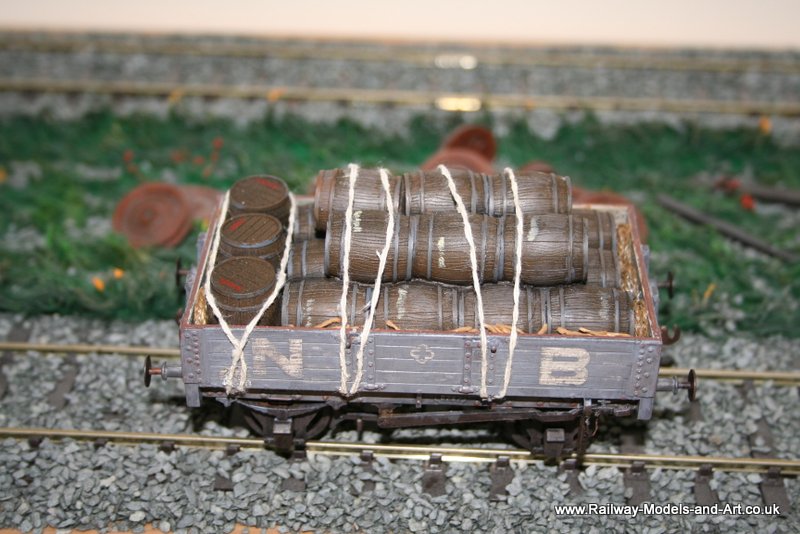
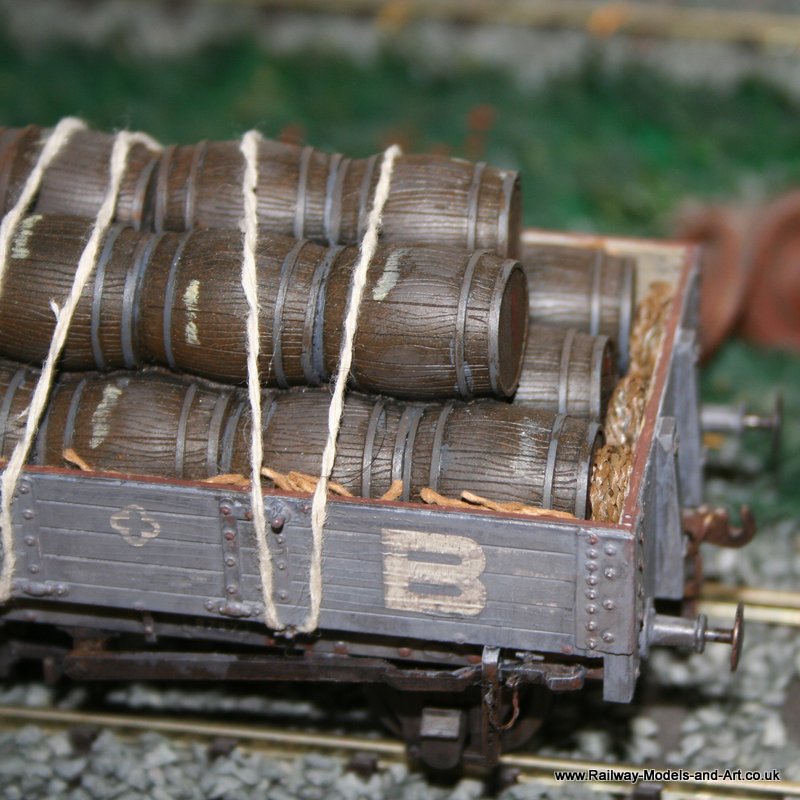
In between finishing off my shelf queens I have also been messing about with making a few wagon loads.
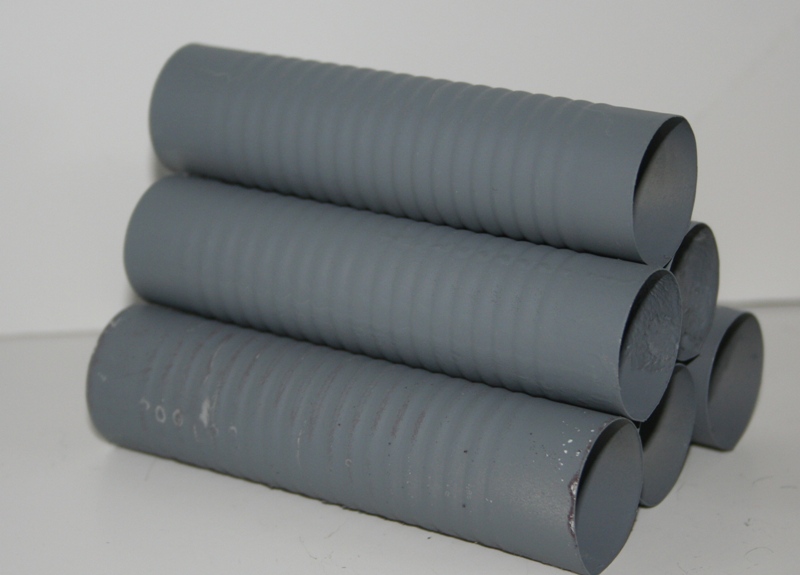
I started by wanting to make some pipes. Having looked around for something suitable and finding nothing I raided the recycle box, taking out a couple of tins that canned tomatoes came in. Using a pair of snips I cut down the side and chopped the bottom and the rim off.
Then I ran them through my rolling bars to flatten it out so that I could mark it up. Once it was flat I squared the edges and marked each one into 3 sections. I cut them out and re-rolled them into smaller diameter tubes. The two cans yielding 6 tubes. I held them together with wire and soldered them with a roll of plumbers solder that I had kicking about the bench (I only used this because I still wasn’t sure how well they would turn out and I had got this for nothing so would lose nothing if they still ended up in the recycle box).
Once soldered I gave them a wash and a blow over with some Halfords grey primer and this was the result.
 Wagon loads 003 Wagon loads 006
The next one is nothing more scientific than one of the small cans that Pilchards come in. This just had the top and bottom taken out and a coat of primer.
 Wagon loads 002
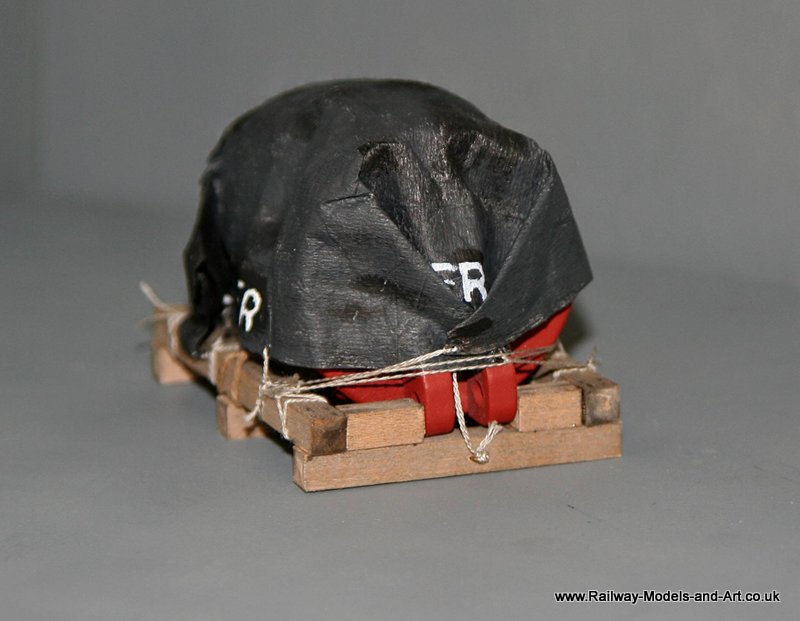
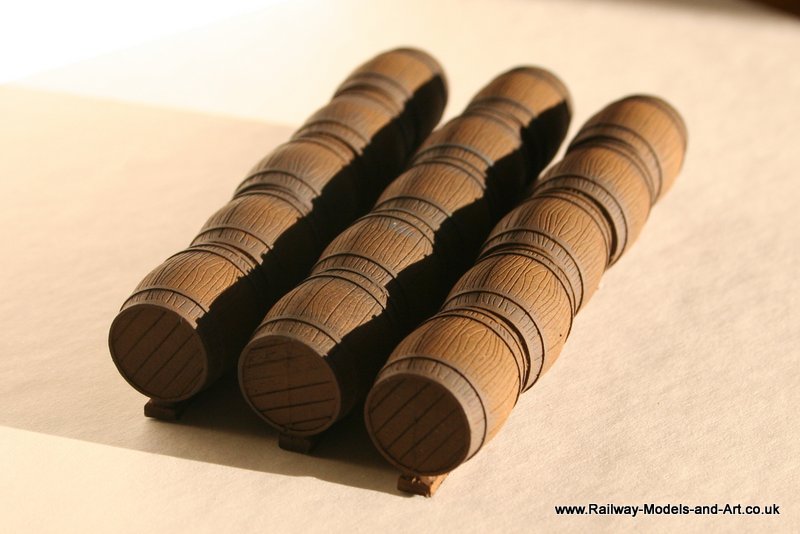
Last up for the moment is from one of my never through anything away because it might be useful stock.
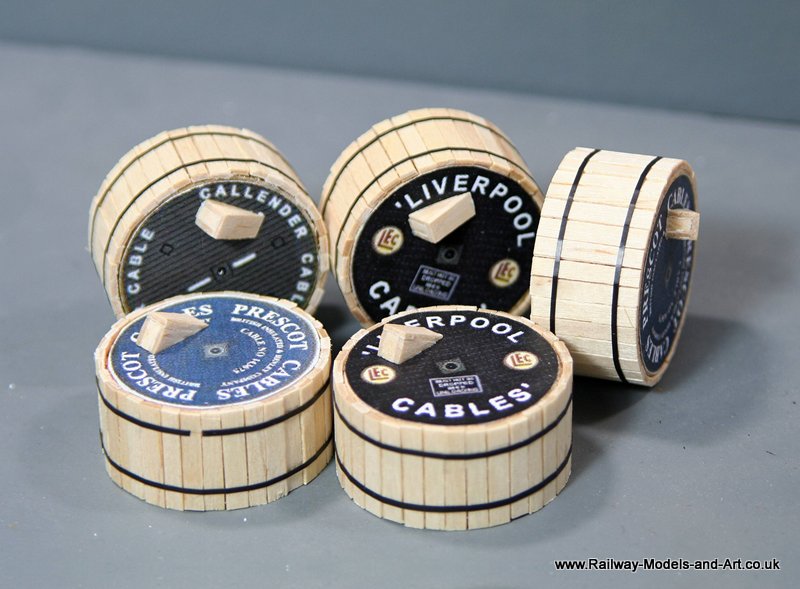
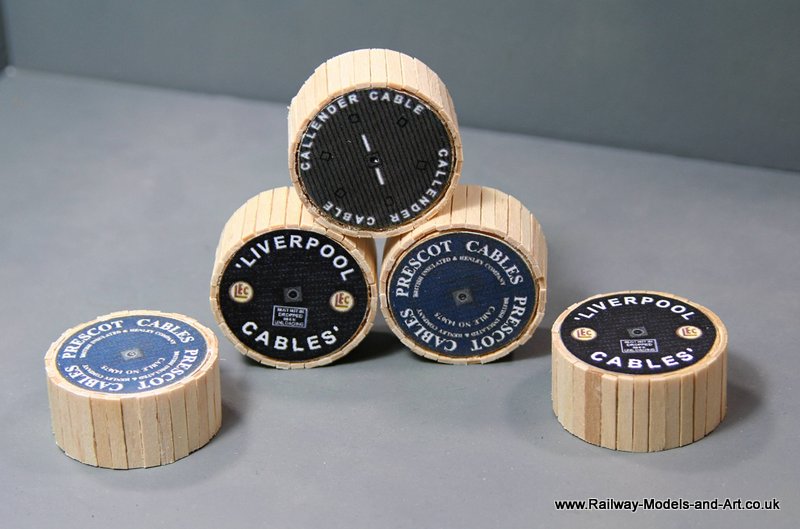
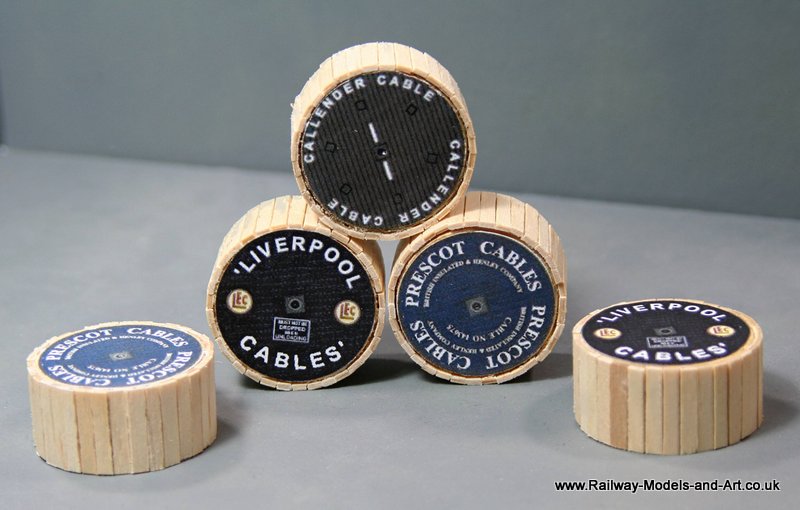
The idea came about from a photo on Paul Barlett’s wagon site that I stumbled upon when researching the pipe wagons – a wagon load of cable drums.
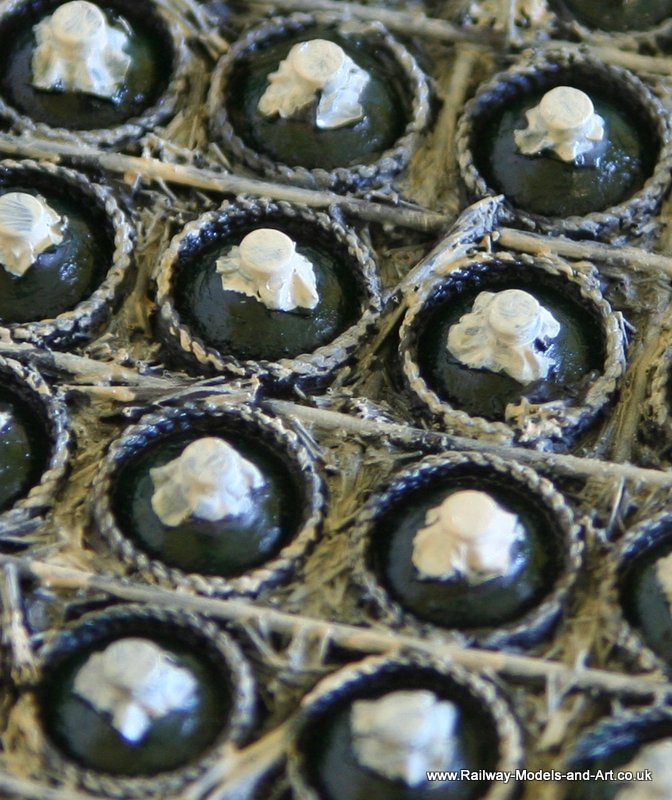
With the mental light bulb on I remembered that when making up the base boards for the layout I had cut a series of holes in the ends for the wiring to pass through.
To make these holes I used a hole cutting saw which left me some nice round sections of plywood that I had hoarded. Taking some of these pieces I sanded the edges down to smooth out a small rim where I had drilled from both sides. Then I stuck some cut down matches to the edges with pva to create the drum. I had picked up a large bag of matches from a craft shop some time ago with vague ideas and they have finally been used for something.
 Wagon loads 005
Regards Rob