Category Archives: Kirk Coach Builds
Seats for everyone
Cut and Shut with Kirk Sides
In response to a query on the GOG forum I promised that I would take a photo of some Kirk sides that I needed to cut and shut and repair the beading on – The beading is Plastruct 0.8mm half round.
It looks like Ian has now run out of the colour pigment that he used to use to colour the LNER coach pieces because they came in white so I had to give them a quick spray to get them to show anything.
I have marked which beading I replaced with a red square. For some reason the top one picked up some much in the solvent (Limonene) which has made it look a bit ragged in the photo but I am sure that it will disappear once I apply the teak varnish to it.
Although it doesn’t look it in the photo the base colour is orange.
Ian Kirk 7mm Gresley BG – Now available in Maroon!
Kirk 51 foot All 3rd – interior details
This last weekend saw a little more progress on the Kirk coaches.
The seating is assembled for the all third and the roof made ready to fit.
Conversations on a few forums around how to attach the roof, have had the side effect of making me think about fitting passengers (which neither Don or I had considered/discussed). Due to me having already glued the floor in ( I won’t do that on future builds) I was exploring unobtrusive ways that I might make the room removable.
Having consulted Don who agreed that we should make provision for the fitting of passengers. – Albeit not that many due to the decline of passengers using the line in Don’s modelled period. I was still mulling over various ways of fixing the roof when I realised that the roof ends don’t quite match the profile of the ends of the coach. This is due to the way that Ian makes them by vacuum forming. When I say don’t quite fit I am sure that the discrepancy will be taken up by gluing the roofs on as originally planned. But if I attempted to screw them on in any way, I would be left with an unsightly gap at either end.
A bit more head scratching and looking at the way that windows fit I decided that I could make it so that the windows cannot be dislodged by handling (which was another fear of gluing the roof on) and that if I fitted some passengers before gluing the roof down, it would mean that Don didn’t need to gain access to do it later.
I had some Slaters seated passengers to hand and they provided a welcome distraction and rekindling of interest,which I have to confess due to pressures at work was waning a little.
While the painting of said passengers (particularly the faces) isn’t as good as some, I am pleased with how they have come out and they will certainly pass muster inside the gloomy interior of the coach once matt varnished.
If you wonder why they are sat above the box instead of on it, that’s because I have inserted a length of plastic rod to enable me to old them while painting and and it will help in making them securely fastened to the seats when fitted.
Kirk Gresley Coaches 51ft All 3rd – Underframe fittings
I got a little more done on the All 3rd this weekend. – Sole bars, footsteps, battery boxes and queen posts all got fitted. I also did a bit more work on fitting the roof of the BG but there’s nothing really to see. I also got the mounting brackets fitted on the dynamo but I forgot to bring it home for photos (not that it looks any different to the one that I did for the BG to be fair).
Gresley Coach Bogies, Newbould 8′ and ABS/Cavalier 8’6″
This weekend saw the bogies completed and primed. I had initially struggled to work out how to get the ABS Cavalier bogies together and an email to Adrian had him suggesting the addition of bit’s of welding rod to strengthen them. Having discussed the matter with Don we agreed that if I couldn’t get them together then I would use the Kirk bogies supplied instead.
Lo and behold when I looked again at them yesterday morning it all became clear and they were assembled in no time. There was minimal flash and I just had to file the ends of the bogie sides where they fit into the ends ever so slightly to remove a gap.
On the Newbould bogies shown mostly complete earlier I adjusted the springs that I had wrong to sit under the spring stops, then added the bolsters and the brakes. Both sets had a good wash and then a squirt with primer.
I will leave this until next week to harden completely before putting on the top coat of black.
Newbould 8′ on the left, ABS/Cavalier 8’6″ on the right.
Newbould 8′
ABS/Cavalier 8’6″ – and of course I see from the photos that I need to add some handles to the axle box fronts…
Looking More Like a Gresley Coach
Gresley Coach Roof – ready for fitting
A few days off has enabled further progress with the coach builds.
The roof for the BG is now complete.
The sides for the all third have had their T handles carved off and all parts are now joined together to make each side.
More work has ensued on the underframe of the BG but I haven’t taken any photos yet – hopefully tomorrow.
“and there’s more”
To quote a comedian whose name I cannot remember – “and there’s more”
Last night I only had a little time at the bench and got completely distracted from the brake van by thoughts on vacuum tanks for the all third. I recently managed to get some really good underfloor detail photos from an LNER 3 compartment first at Stainmore railway. which included good shots of vacuum tanks and cylinders – They are on my Flickr site should anyone need them
This is where I got to, they still need much cleaning up and for the legs to be straightened/cut to length and I plan to solder them to some scrap brass plate to give an area to glue to.
All about Dynamos, LNER Coach Dynamos that is.
Work progressed over the weekend with much of the available time being spent on fitting the roof which is now almost there. It’s the first one of Ian’s bow ended roofs that I have tackled and I am sure another would be much easier.
In between sessions on the roof I attached the battery box and prepared the V hangers for the vacuum cylinders. Not many words and not much to show visually either.
What is worth sharing visually, is that I did more work to one of the dynamos.
Starting from this, if you will forgive the repeat of an earlier photo.
And using this as my working example (this is one of the very nice Sidelines castings).
I arrived at this.
I am so pleased with the result that I plan to [s]rip[/s] gently prise the dynamo off the parcels coach that I am building for myself which just needs final details and painting and modifying it to the same spec.
Looking Like An LNER Coach At Last
Further work ensued on the BG this weekend and it’s now starting to look coach like.
Ignore the bogies, they were to hand so I used them to prop the coach on for the photos
In between I made up the battery boxes for the all 3rd.
One I forgot
Kirk 52′ BG Humble Beginings
Although still recovering I managed to get more done on the Kirk BG last weekend.
There was a small moulding fault on one of the sections so I elected to use it in the side that I was cutting out for the ducket. The ducket itself is one of my Silhouette cut examples Oddly I needed to cut a couple of different sizes because the ones that I had left from the last build were slightly small in the hole.
There was another issue with the solebars for the kit which were all twisted as they came. An email from Don to Ian Kirk had some replacements in the post next day. I had already stuck the sides together so it wasn’t worth asking Ian to replace the section with the moulding fault. I just cut the section out squarely and let in a piece of styrene rod. Once dry I filed it to shape (much like they would have repaired damage to a coach in service). – I must take this opportunity to commend Ian for his prompt service.
Three weeks ago I had added the base plates for the bump stops, I added the bump stops themselves on Saturday. After leaving them over night to set I filed them to uniform length using a scrap of 10 thou styrene with a hole in it. I also add the upper hinges but I will leave the lower ones until later because they are a bit vulnerable.
I also worked on detailing the ends – I like to build up as many sub assemblies as I can before putting it together.
First I made a couple of door knobs from some styrene rod.
Then I added them to the doors in the ends along with lamp irons and lighting connectors. I used my ever handy lense tissue to make the canvas tops for the corridor connections.
And finally I detailed up the Dynamos. These are a bit plain as they come and I had initially stuck a H section stem but seeing a 1/32 scratch build of a Pullman coach over on RMweb shamed me into doing something better. – I still need to make the mounting brackets yet. There are two because Don has asked me to build and all third to go with the other two as well.
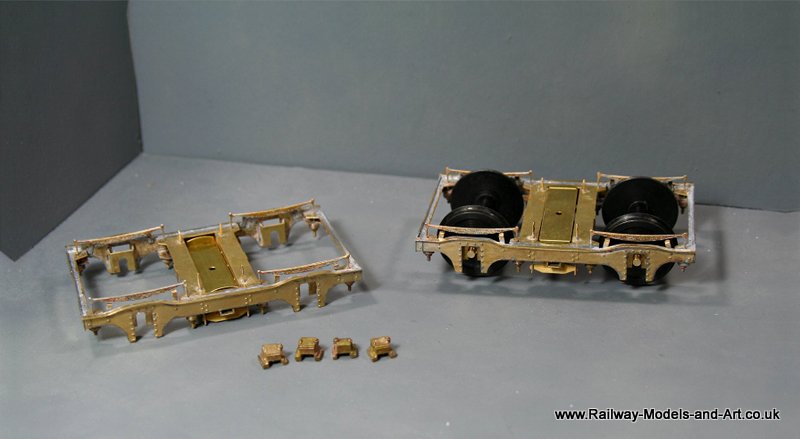
Newbould Models 8′ Gresley Bogies.
Taking advantage of a few days at home in Wakefield in between doing battle with DCC I have been building a few items in brass.
The first is a pair of Newbould Models 8′ Gresley bogies. These are destined for another 51′ full brake, this time a gangwayed version.
Don Gillam, the gent who bought the non gangwayed version that I had for sale back in August, asked if I would build another Kirk kit that he had bought but not started on on his behalf.
This is where I have got to.
Kirk Parcels van ready for Sale (well almost!)
The Kirk brake is even nearer the finish line/small adds.
Sadly the eagle eyed amongst you will notice that the roof doesn’t sit down right at one end. That’s despite lots of work making them fit in the first place. I only noticed it once I had glued the roof on so it will need to be filled. Not the end of the world but a little frustrating.
I had a bit of a Doh! moment when ordering the transfers for the CCT in that I did plan any for the Parcels van. I am very grateful to Warren for coming to my rescue with these.
7mm Scale Vacuum and Steam pipes for the Kirk Parcels van
Kirk 51Foot Parcels van – final detailing.
The weekend’s endeavours also saw the Parcels van heading towards the finish line.
It now sport’s glazing, guards grab handrails and T handles. Still to add are the luggage door handles, vacuum and steam pipes and transfers (I think) plus tidy up the paintwork and matt varnish.
Note to self: clean of all the plastic dust from drilling out handrails etc. before taking more photos…..